Thats right! Microsoft has finally made the decision to let current users of Windows 7 Home or Pro update to Windows 10 Home or Pro for free, and its pretty easy. Removing the bloatware included is the hard part but I can walk you through it here.
You will need 2 things to do the FREE upgrade, and thats a valid Windows 7 Pro key, and the latest copy of Windows 10 made from Microsoft Windows Media Creation software. Just about any Windows 7 key will work from a license sticker on a computer that you have even if its not a PRO key, you will just get the Windows 10 Home addition instead.
Any valid key will work as long as it hasn’t been used more than once.
We are going to install Windows 10 and make it work fast and lean like Windows 7, and we will take certain steps to avoid tying your Windows 10 installation to Windows 10 cloud services as part of this installation.
The goal here will be to strip Windows 10 of cloud services and bloatware, so its “lean and mean” like Windows 7, and is not dependent on Microsoft cloud services to operate, and this will make Windows 10 work like Windows 7, fast, and with far less or no advertisements and more dependable.
Lets get started!
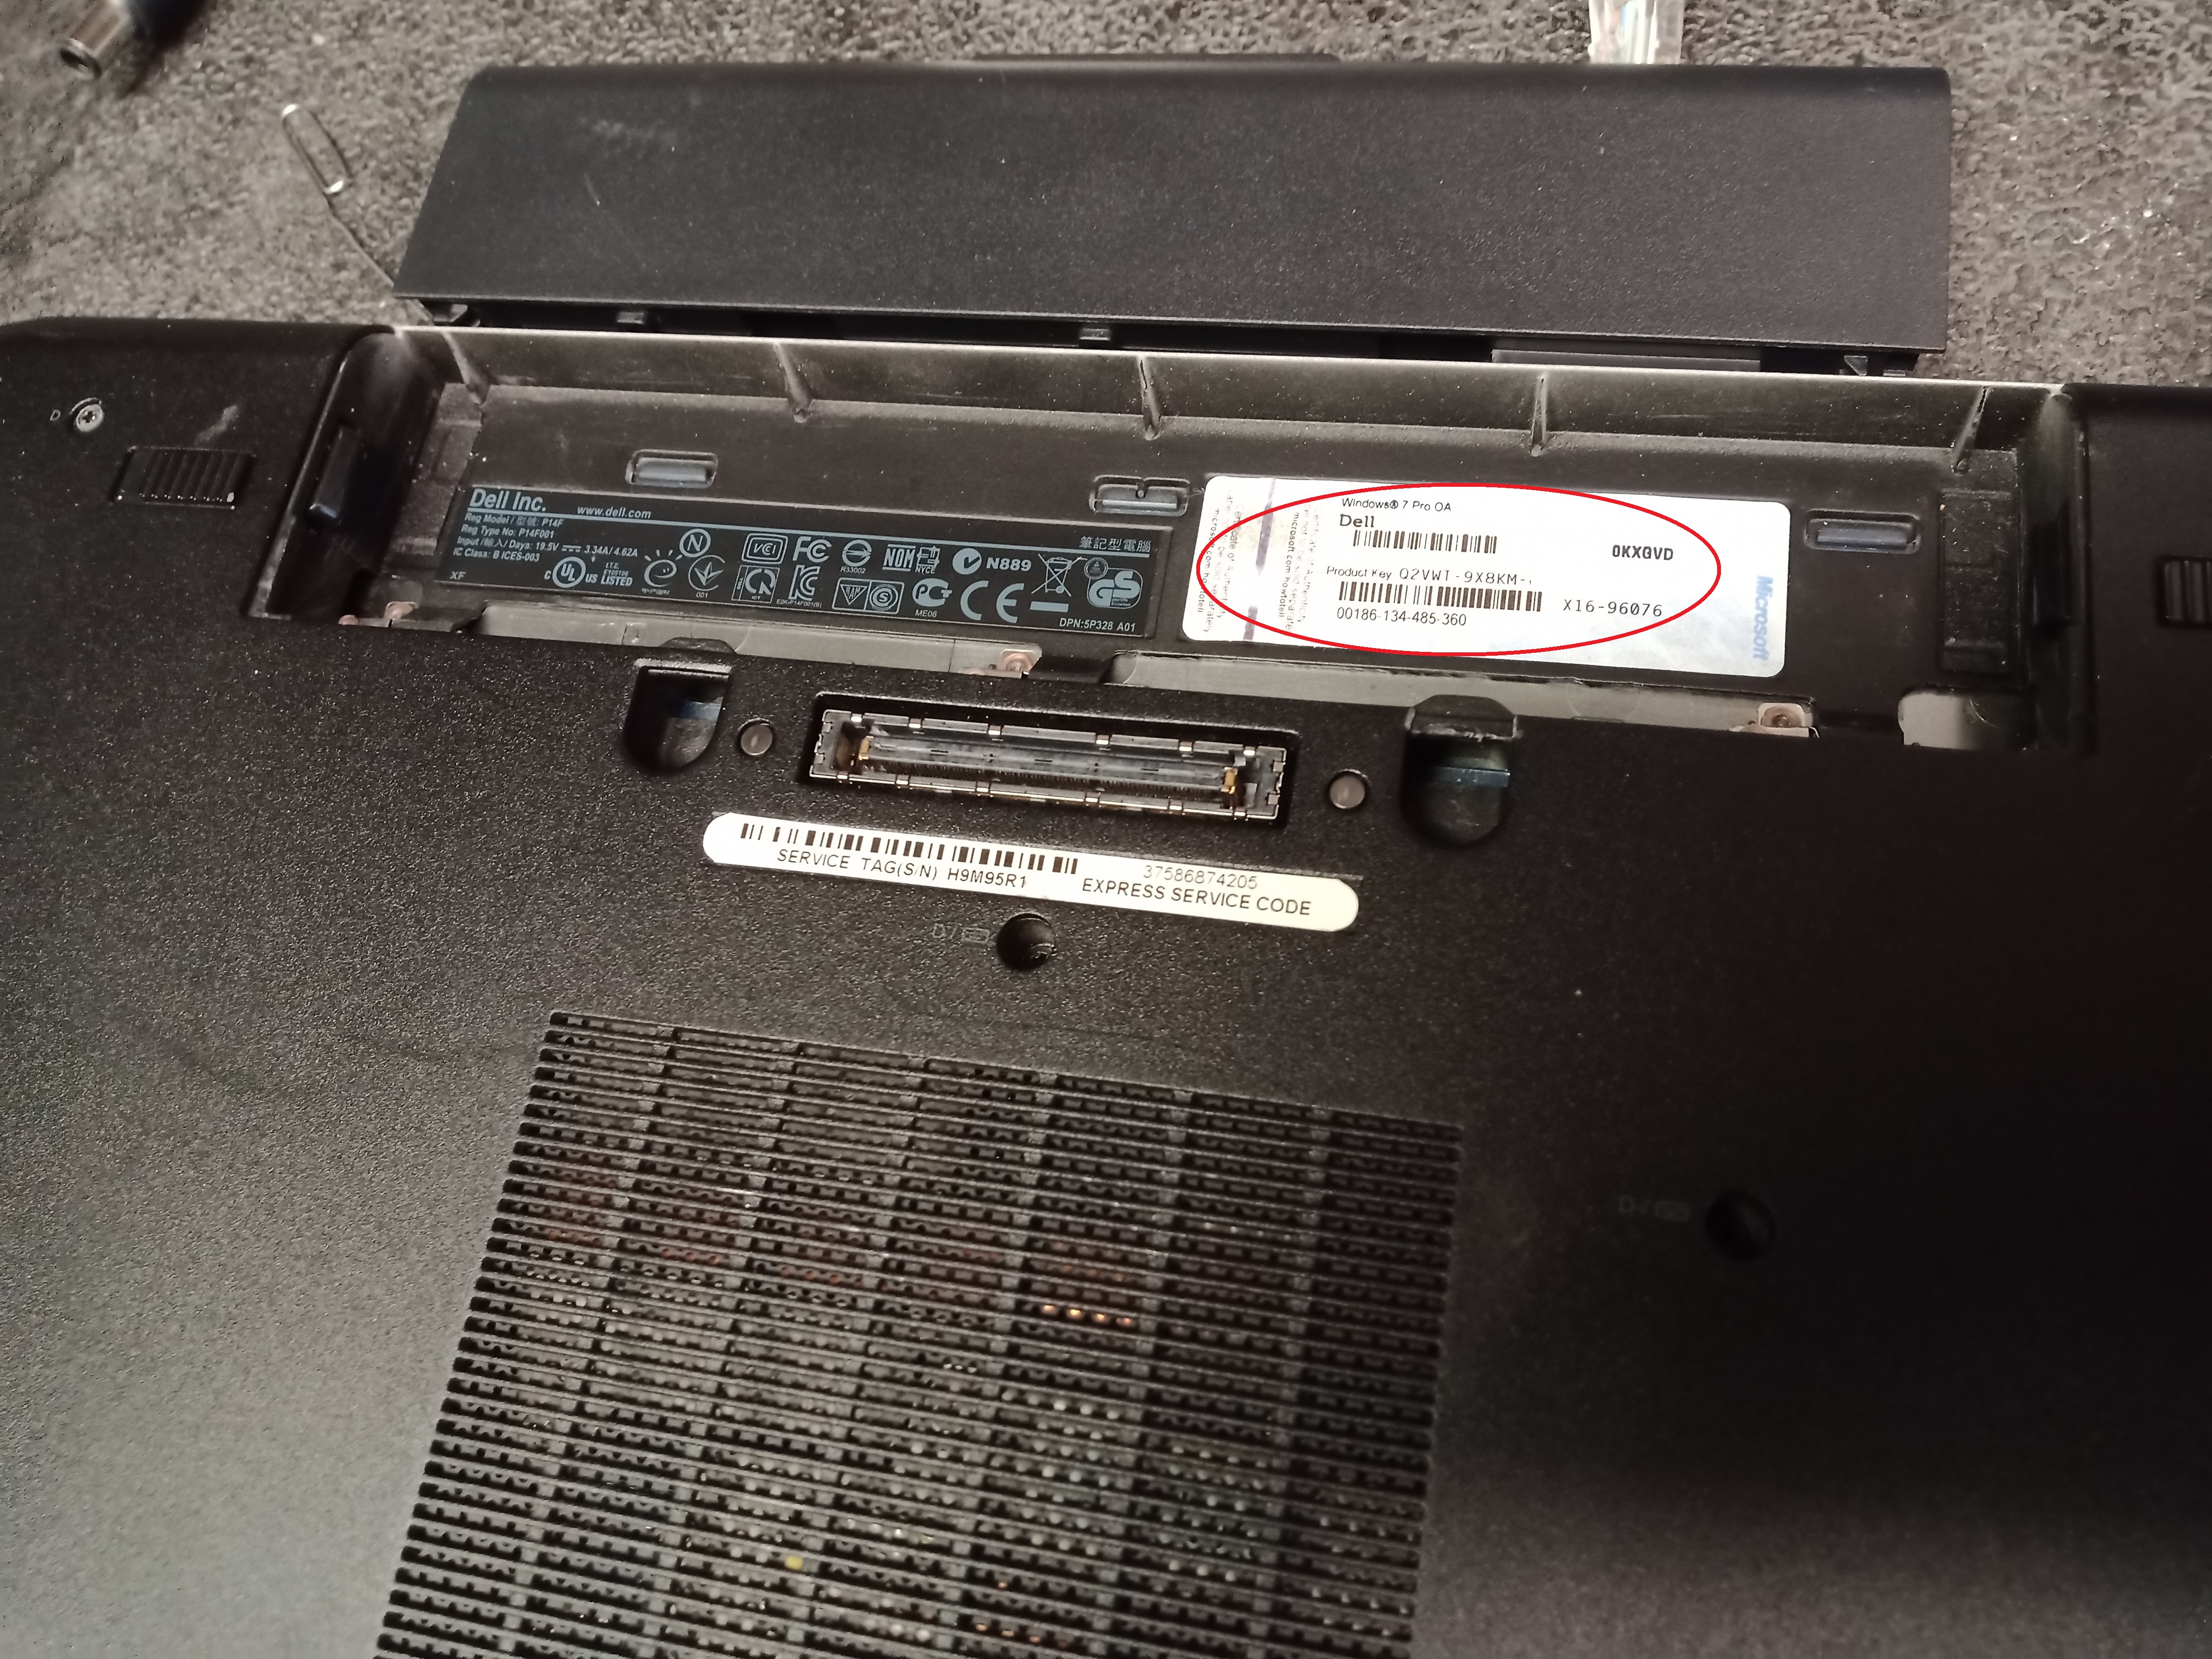
STEP # 1. Locate your Windows 7 key or scan the computer for it using Belarc Advisor.
If you have a license sticker on the bottom, side or top of the computer take a photograph of it with your cell phone or write it down. You will need it for the installation or upgrade to Windows 10 Pro.
On laptops many times they locate the sticker under the battery, like in this photo of this Dell Laptop we will be performing the installation too.
If you do not have a key, don’t fret, there are other ways to get the key from your computer and we will cover that here.
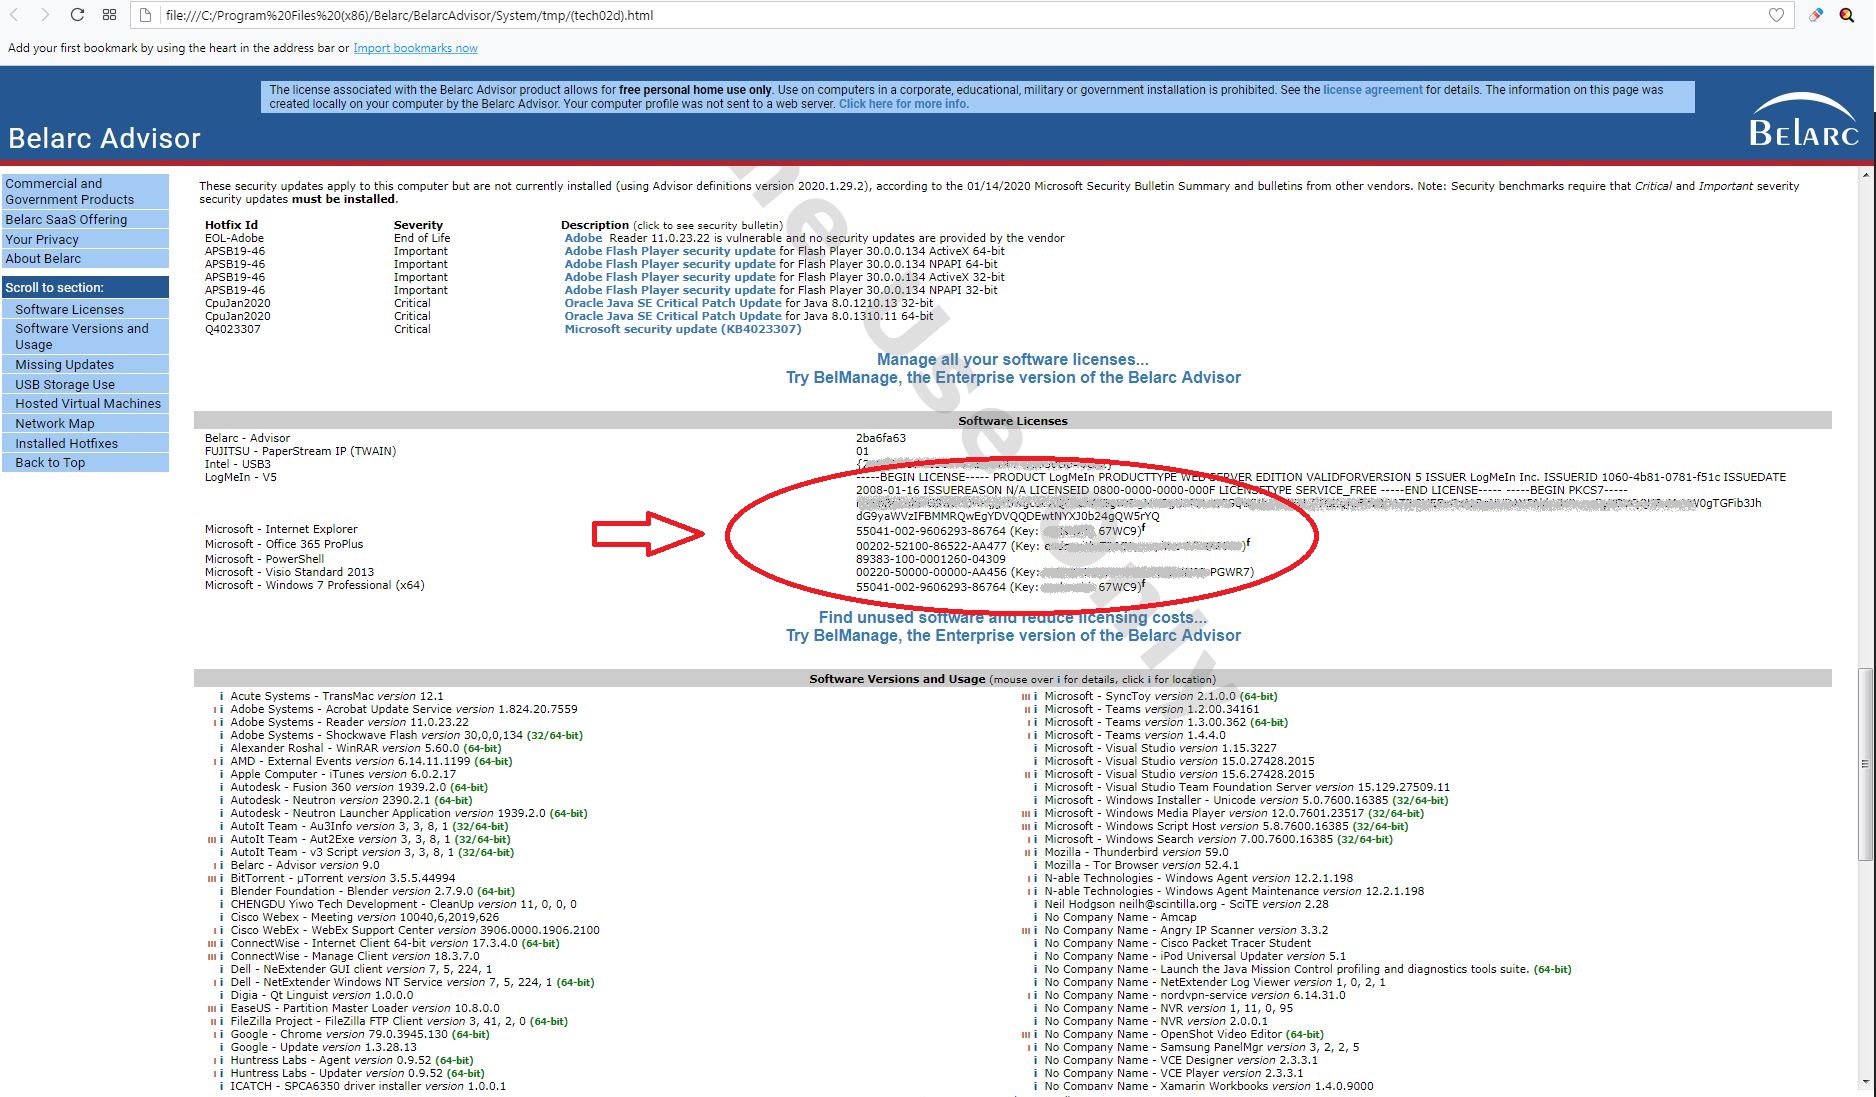
If you have lost the key, or the sticker is not on the computer, you will want to download Belarc Advisor and run it. It will pull all the Microsoft Keys on the computer including Microsoft Office Keys.
HOW TO OBTAIN YOUR LICENSE KEY FROM WINDOWS DIRECTLY
Download Belarc Advisor from here: Click on GREEN button in upper left corner to download latest version.
https://filehippo.com/download_belarc_advisor/
– Run Belarc Advisor and choose the defaults, however I say NO to downloading new security definitions because you don’t really need those to pull the keys.
– Once you run Belarc Advisor it may take a couple of minutes to scan the computer
– When Belarc is complete it will bring up a web page that contains all the data. Scroll down about half way until you see the header (SOFTWARE LICENSES). These are you licenses.
STEP # 2. Download the latest version of Windows 10 using Microsoft Media Creation Tool. You will either need a blank DVD-R and a DVD drive that burns DVDs or you can put it onto a thumbdrive. Installing it too a thumbdrive is usually quicker but I have found DVD tend to work better , especially on older computer because you do need to be able to boot off of the thumbdrive.
Here is the link to download the latest version of Windows 10 using the Media Creation Tool:
https://www.microsoft.com/en-us/software-download/windows10
-You will want to follow the instruction and make either a thumbdrive or a DVD with the latest version of Windows 10. That version the Media Creator makes will have both Home, and Pro versions included. It automatically selects either HOME or PRO based on the license code you have for Windows 7.
STEP #3. Lets begin the installation of Windows 10 to your computer
BACK UP ALL YOUR DATA FIRST!!! Be sure and have whatever other software handy such as Microsoft Office and Intuit Quickbooks, and all the necessary license codes to re-install it. In the case of Quickbooks its under HELP when you run the software.
If possible plug the computer into a physical network jack or have WIFI handy because some of the steps require the computer contact Microsoft via the Internet like activating the Windows license key and / or downloading updates as part of the installation. If you don’t have an Internet connection handy you can still do the entire install but it won’t activate the key or run updates as part of the installation. That will need to be done after the installation.
Second, insert the DVD or Thumbdrive (Blue USB 3.0 slot preferred) and boot from it. Most computers the hot key is F12, but it could be F9, F10, or F11 depending on the model, F2 on some HP models. You may need to look this up, but its usually F9 or F12 for Dell brand computers.
Power off the computer and start pressing the F12 or whatever key brings up the startup menu right when the computer starts. I tend to jiggle the key until I get the startup menu.
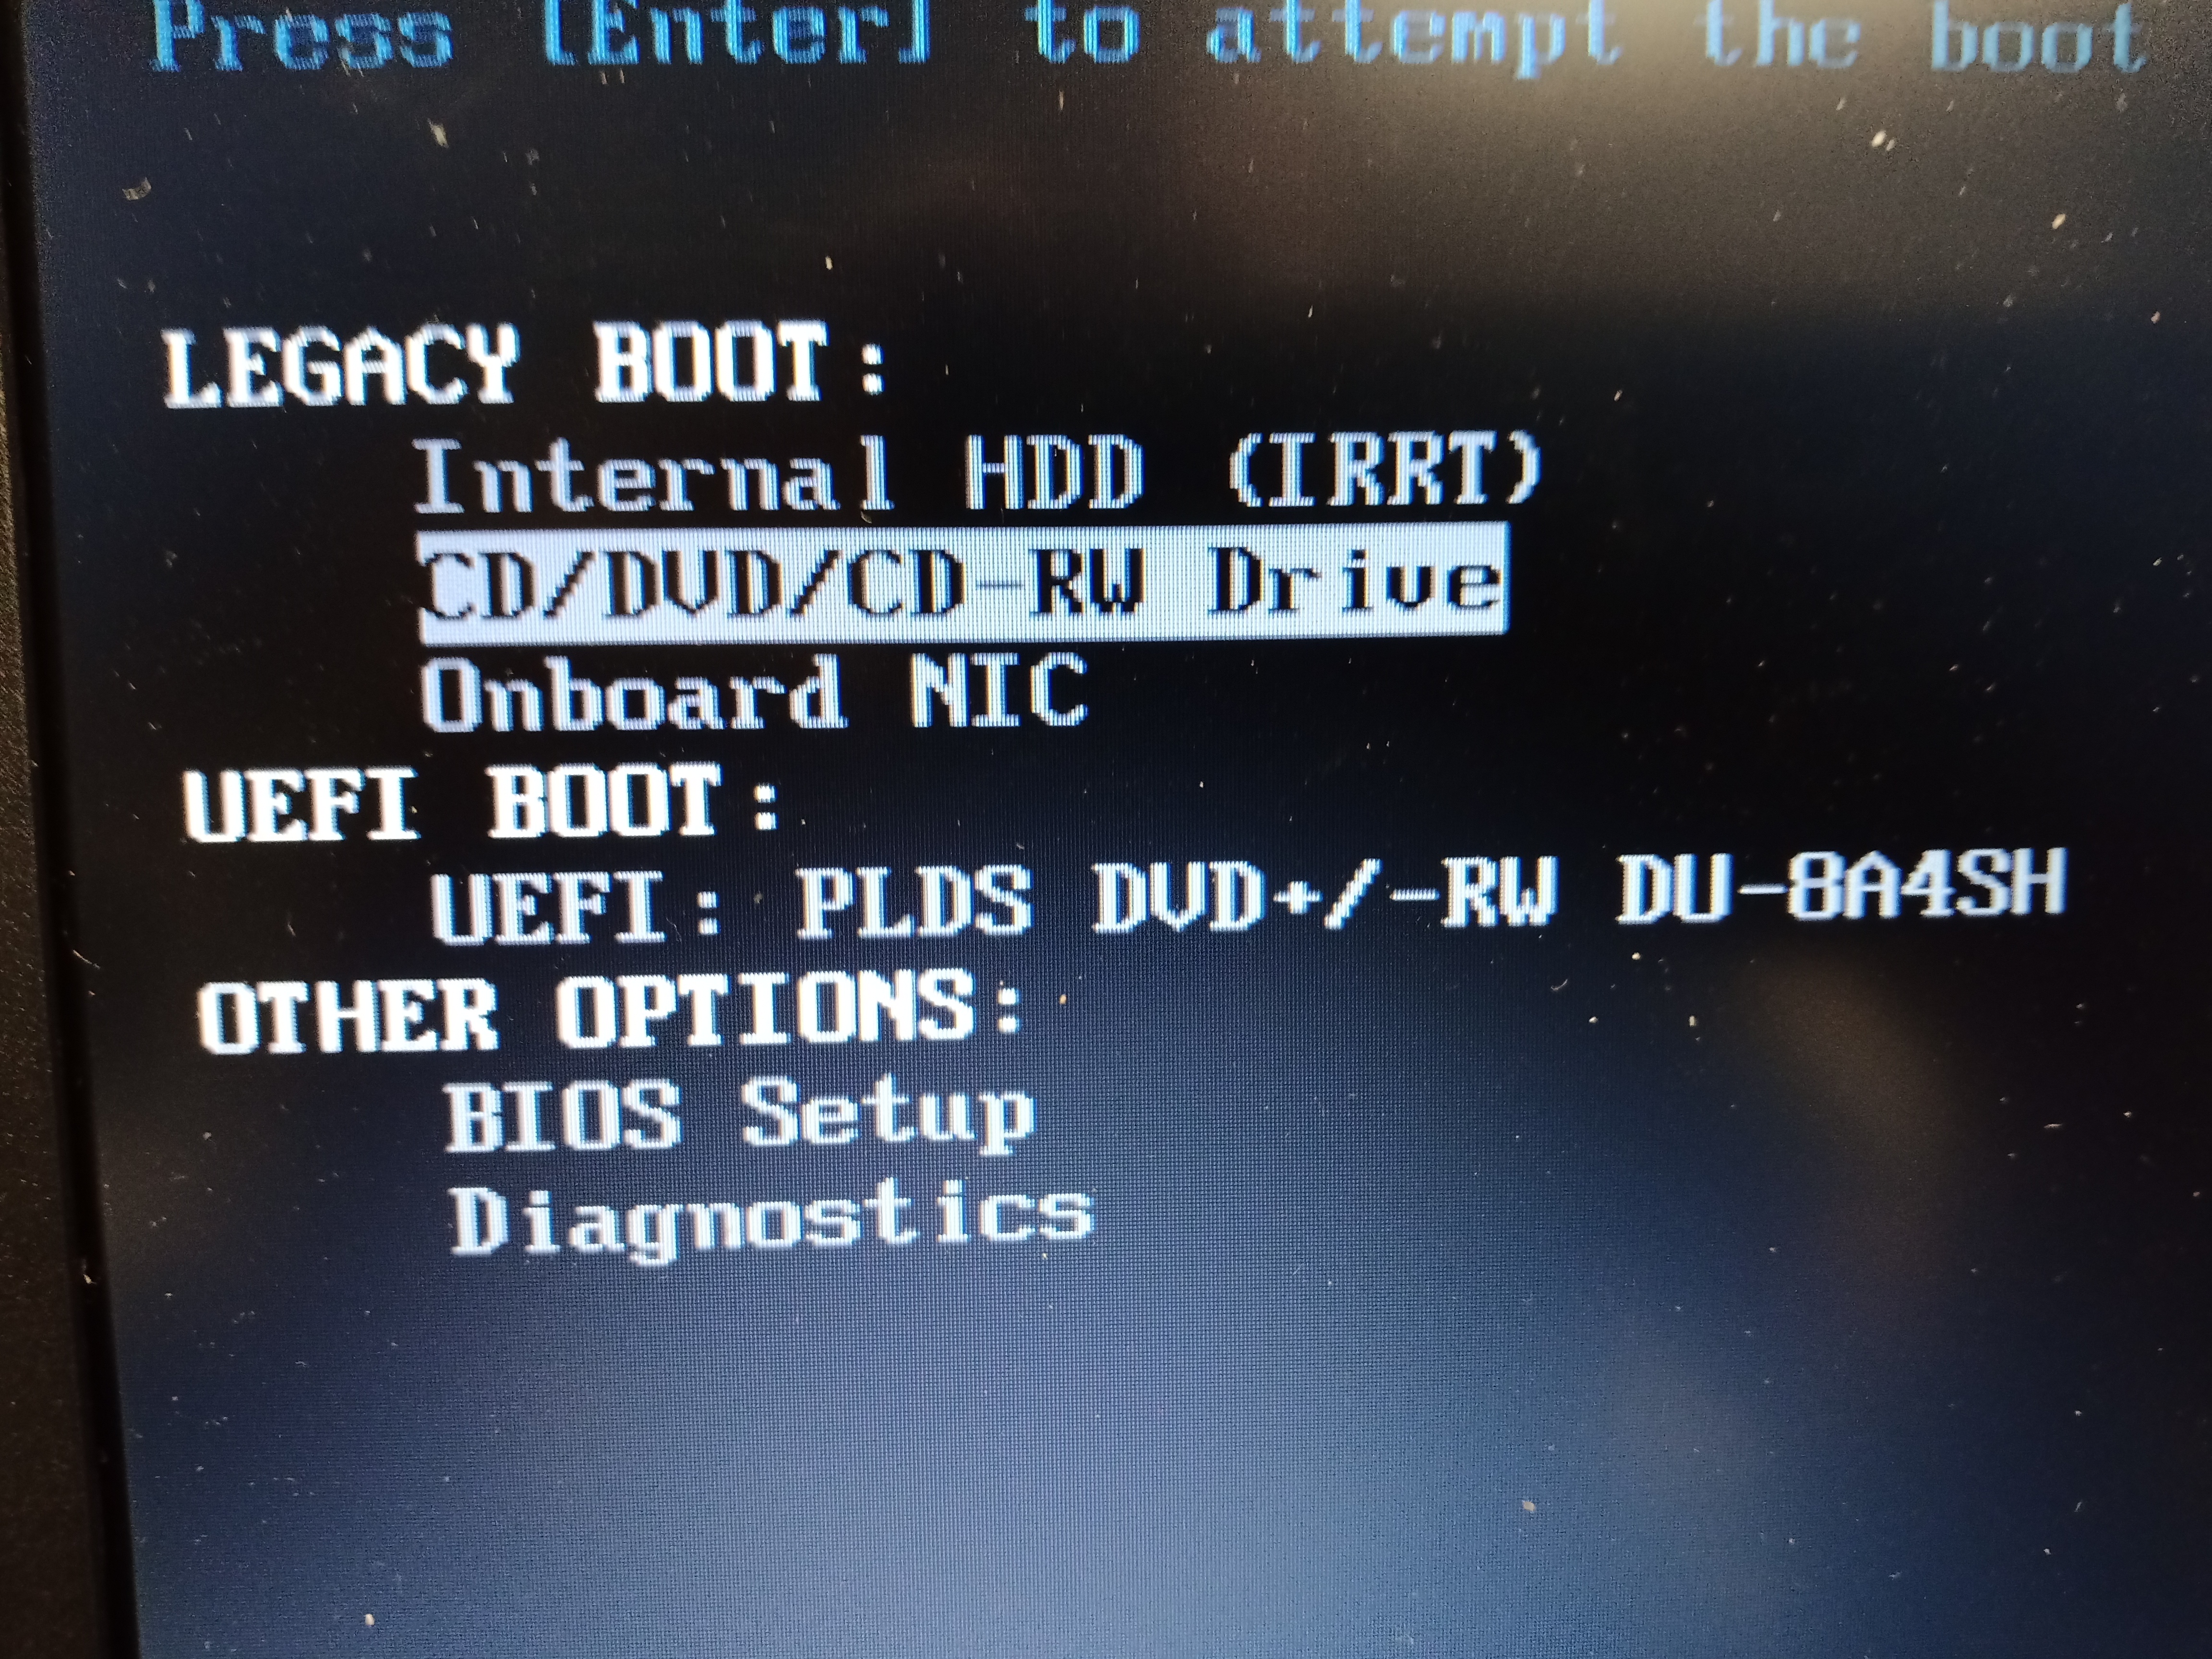
Select DVD if you are booting from a DVD, if a USB Thumbdrive it may only say USB HDD, but it will start with USB. I usually select LEGACY but UEFI may be your only option.
Your next menu should be the Windows 10 Statup menu which looks like this:
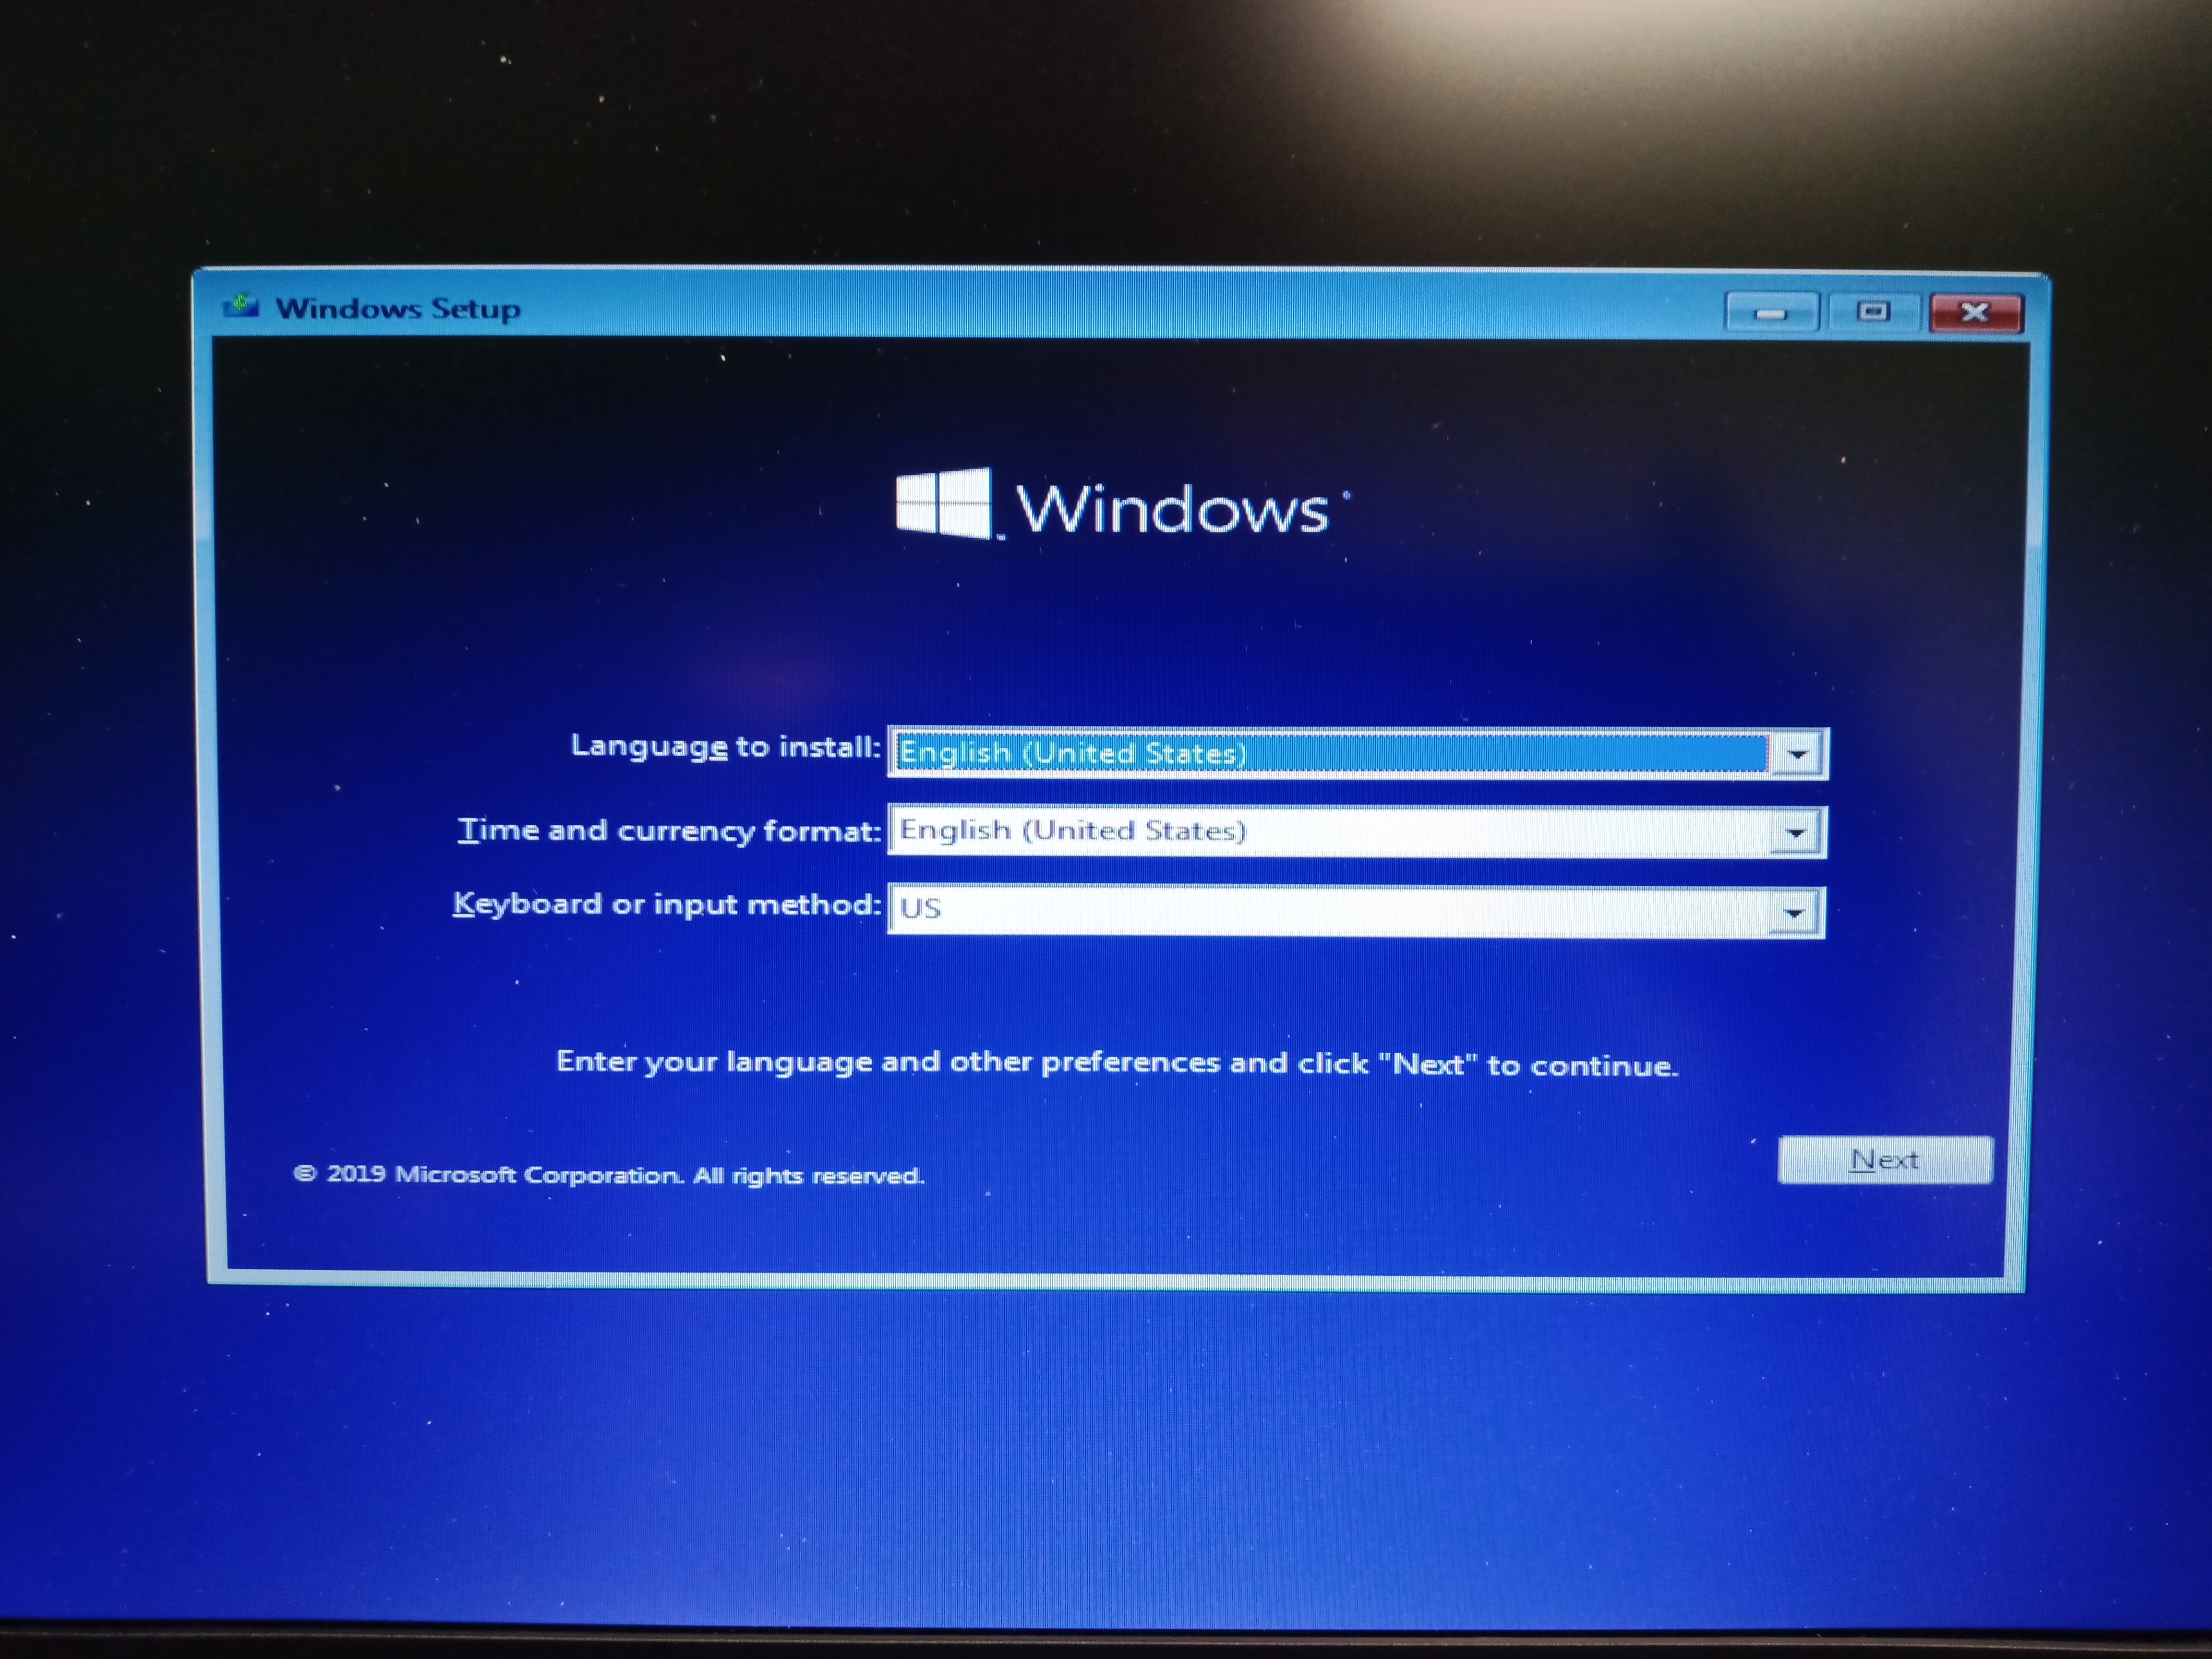
Click NEXT, onto the next menu.
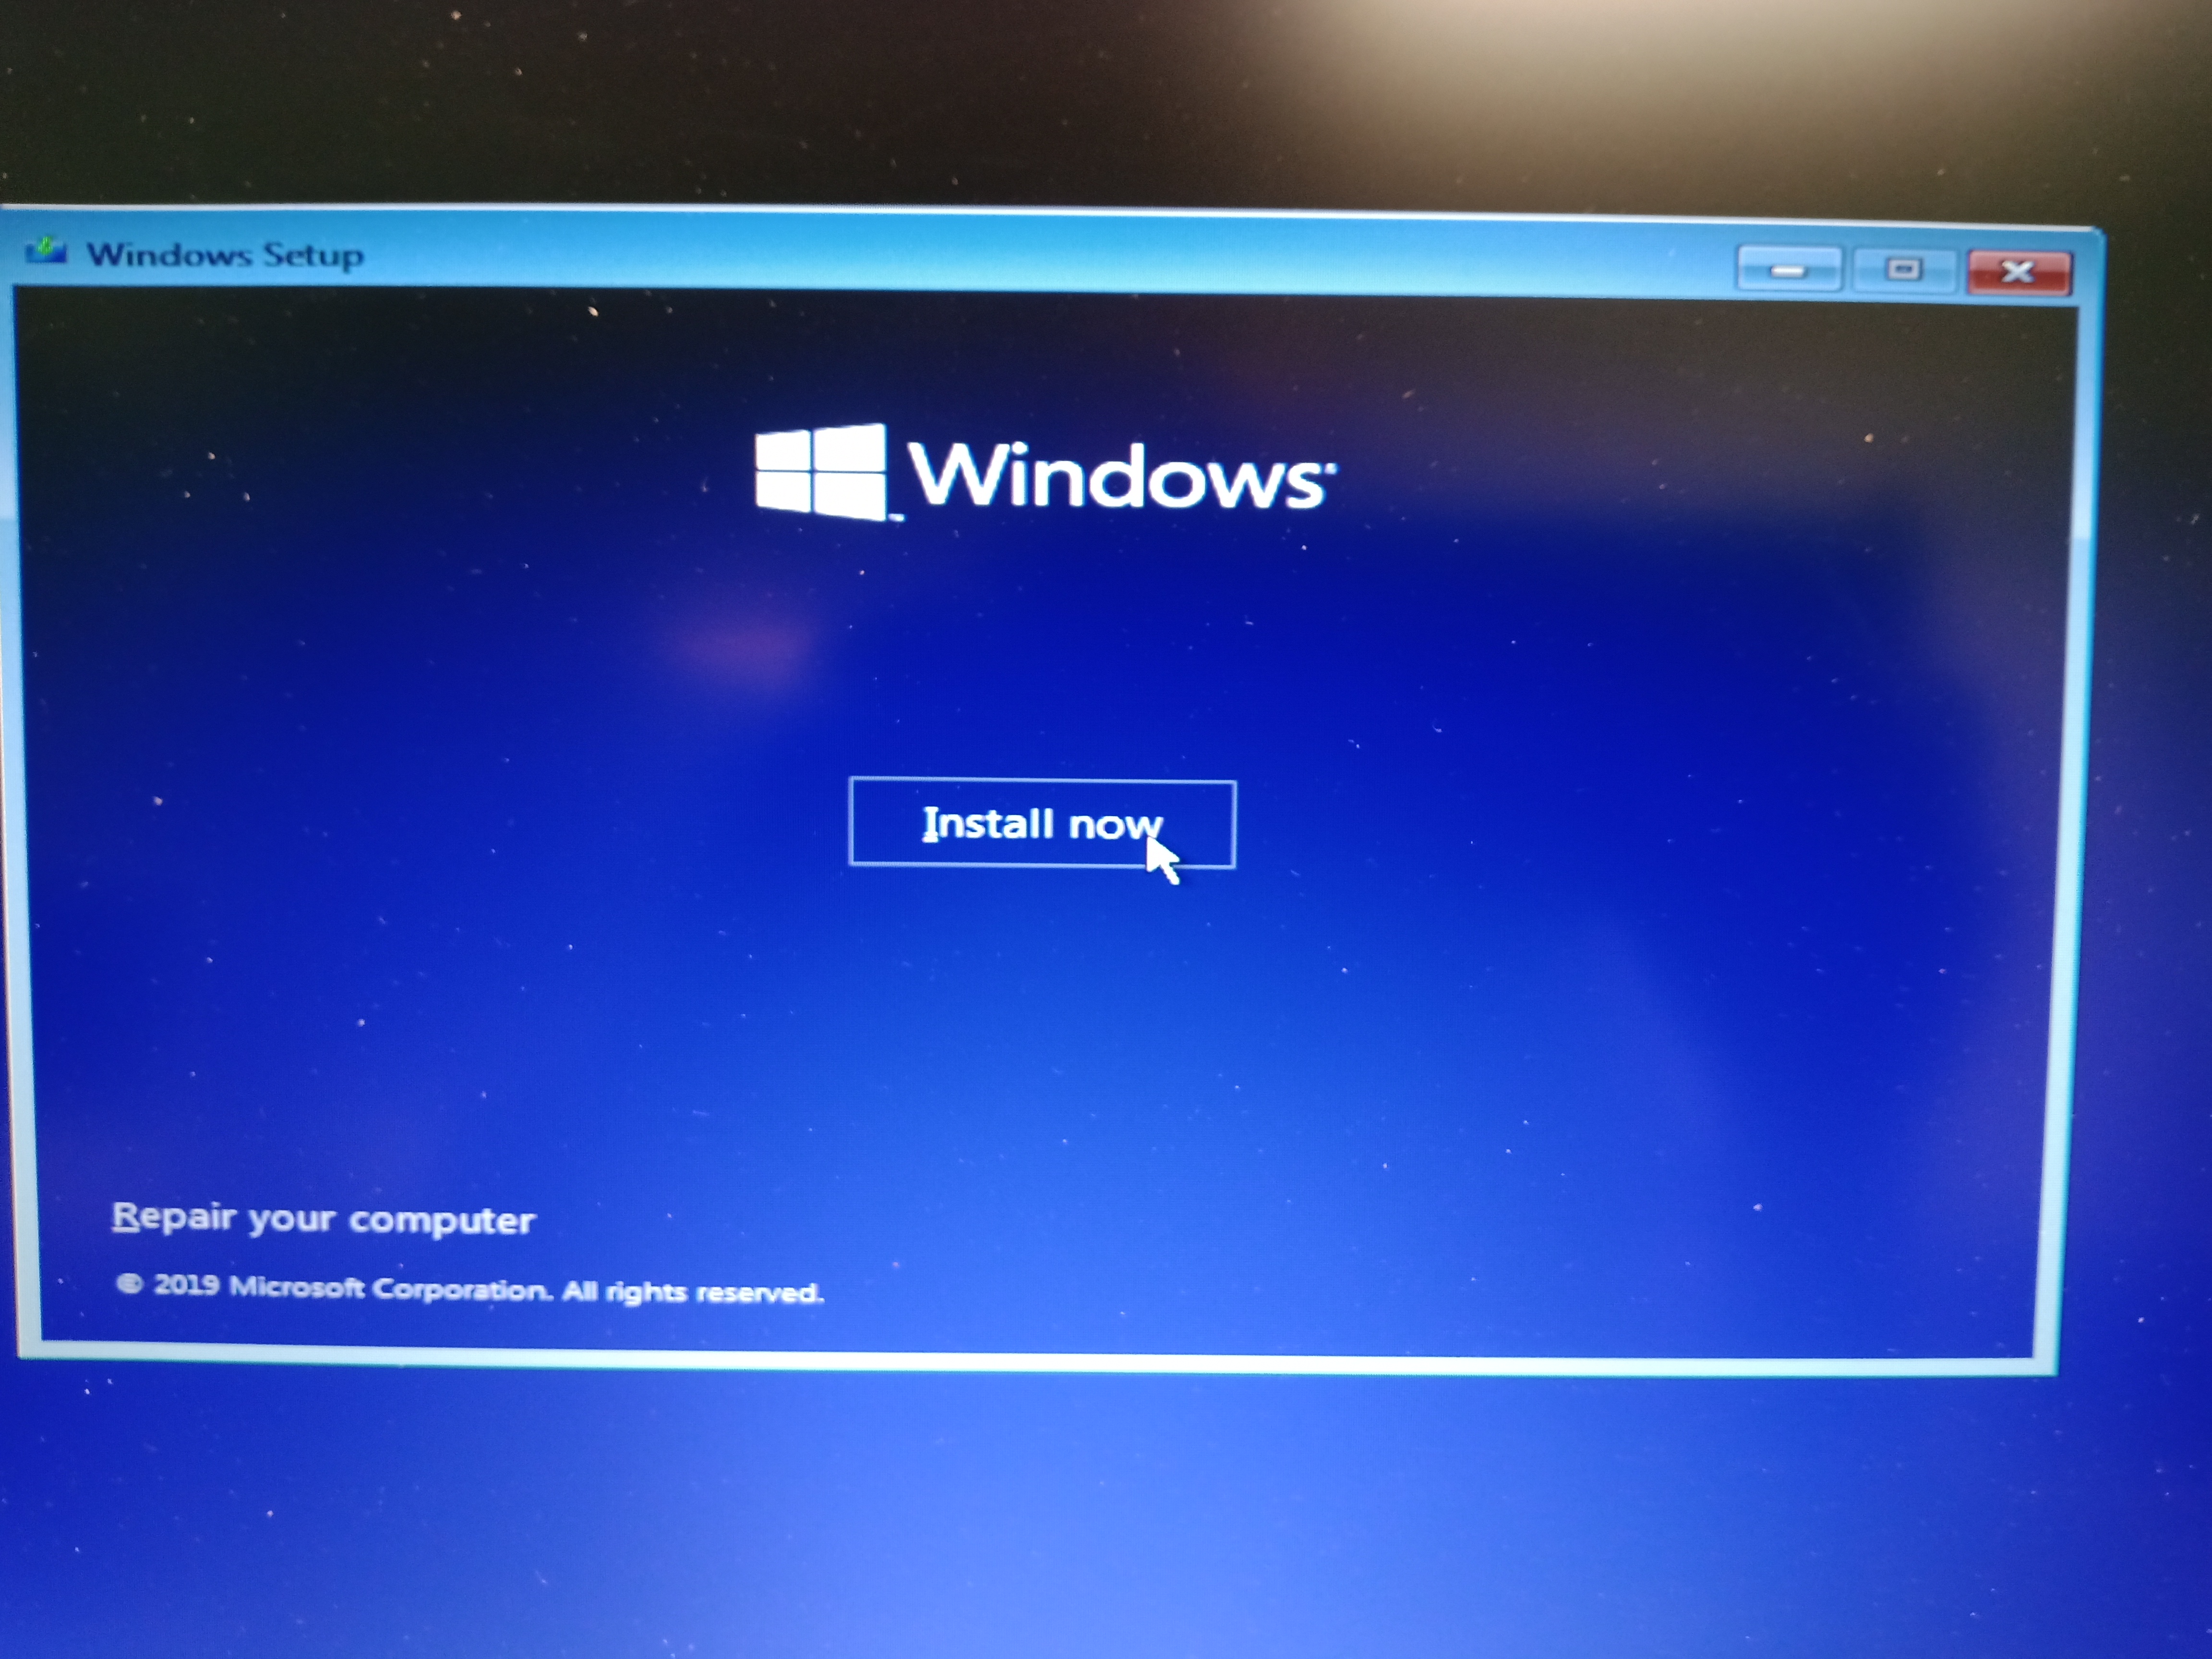
Click INSTALL NOW, and it will say “setup is starting”
If you have a computer that does not have the Windows License Key built-in to the BIOS you will know because it will now prompt you for the license key.
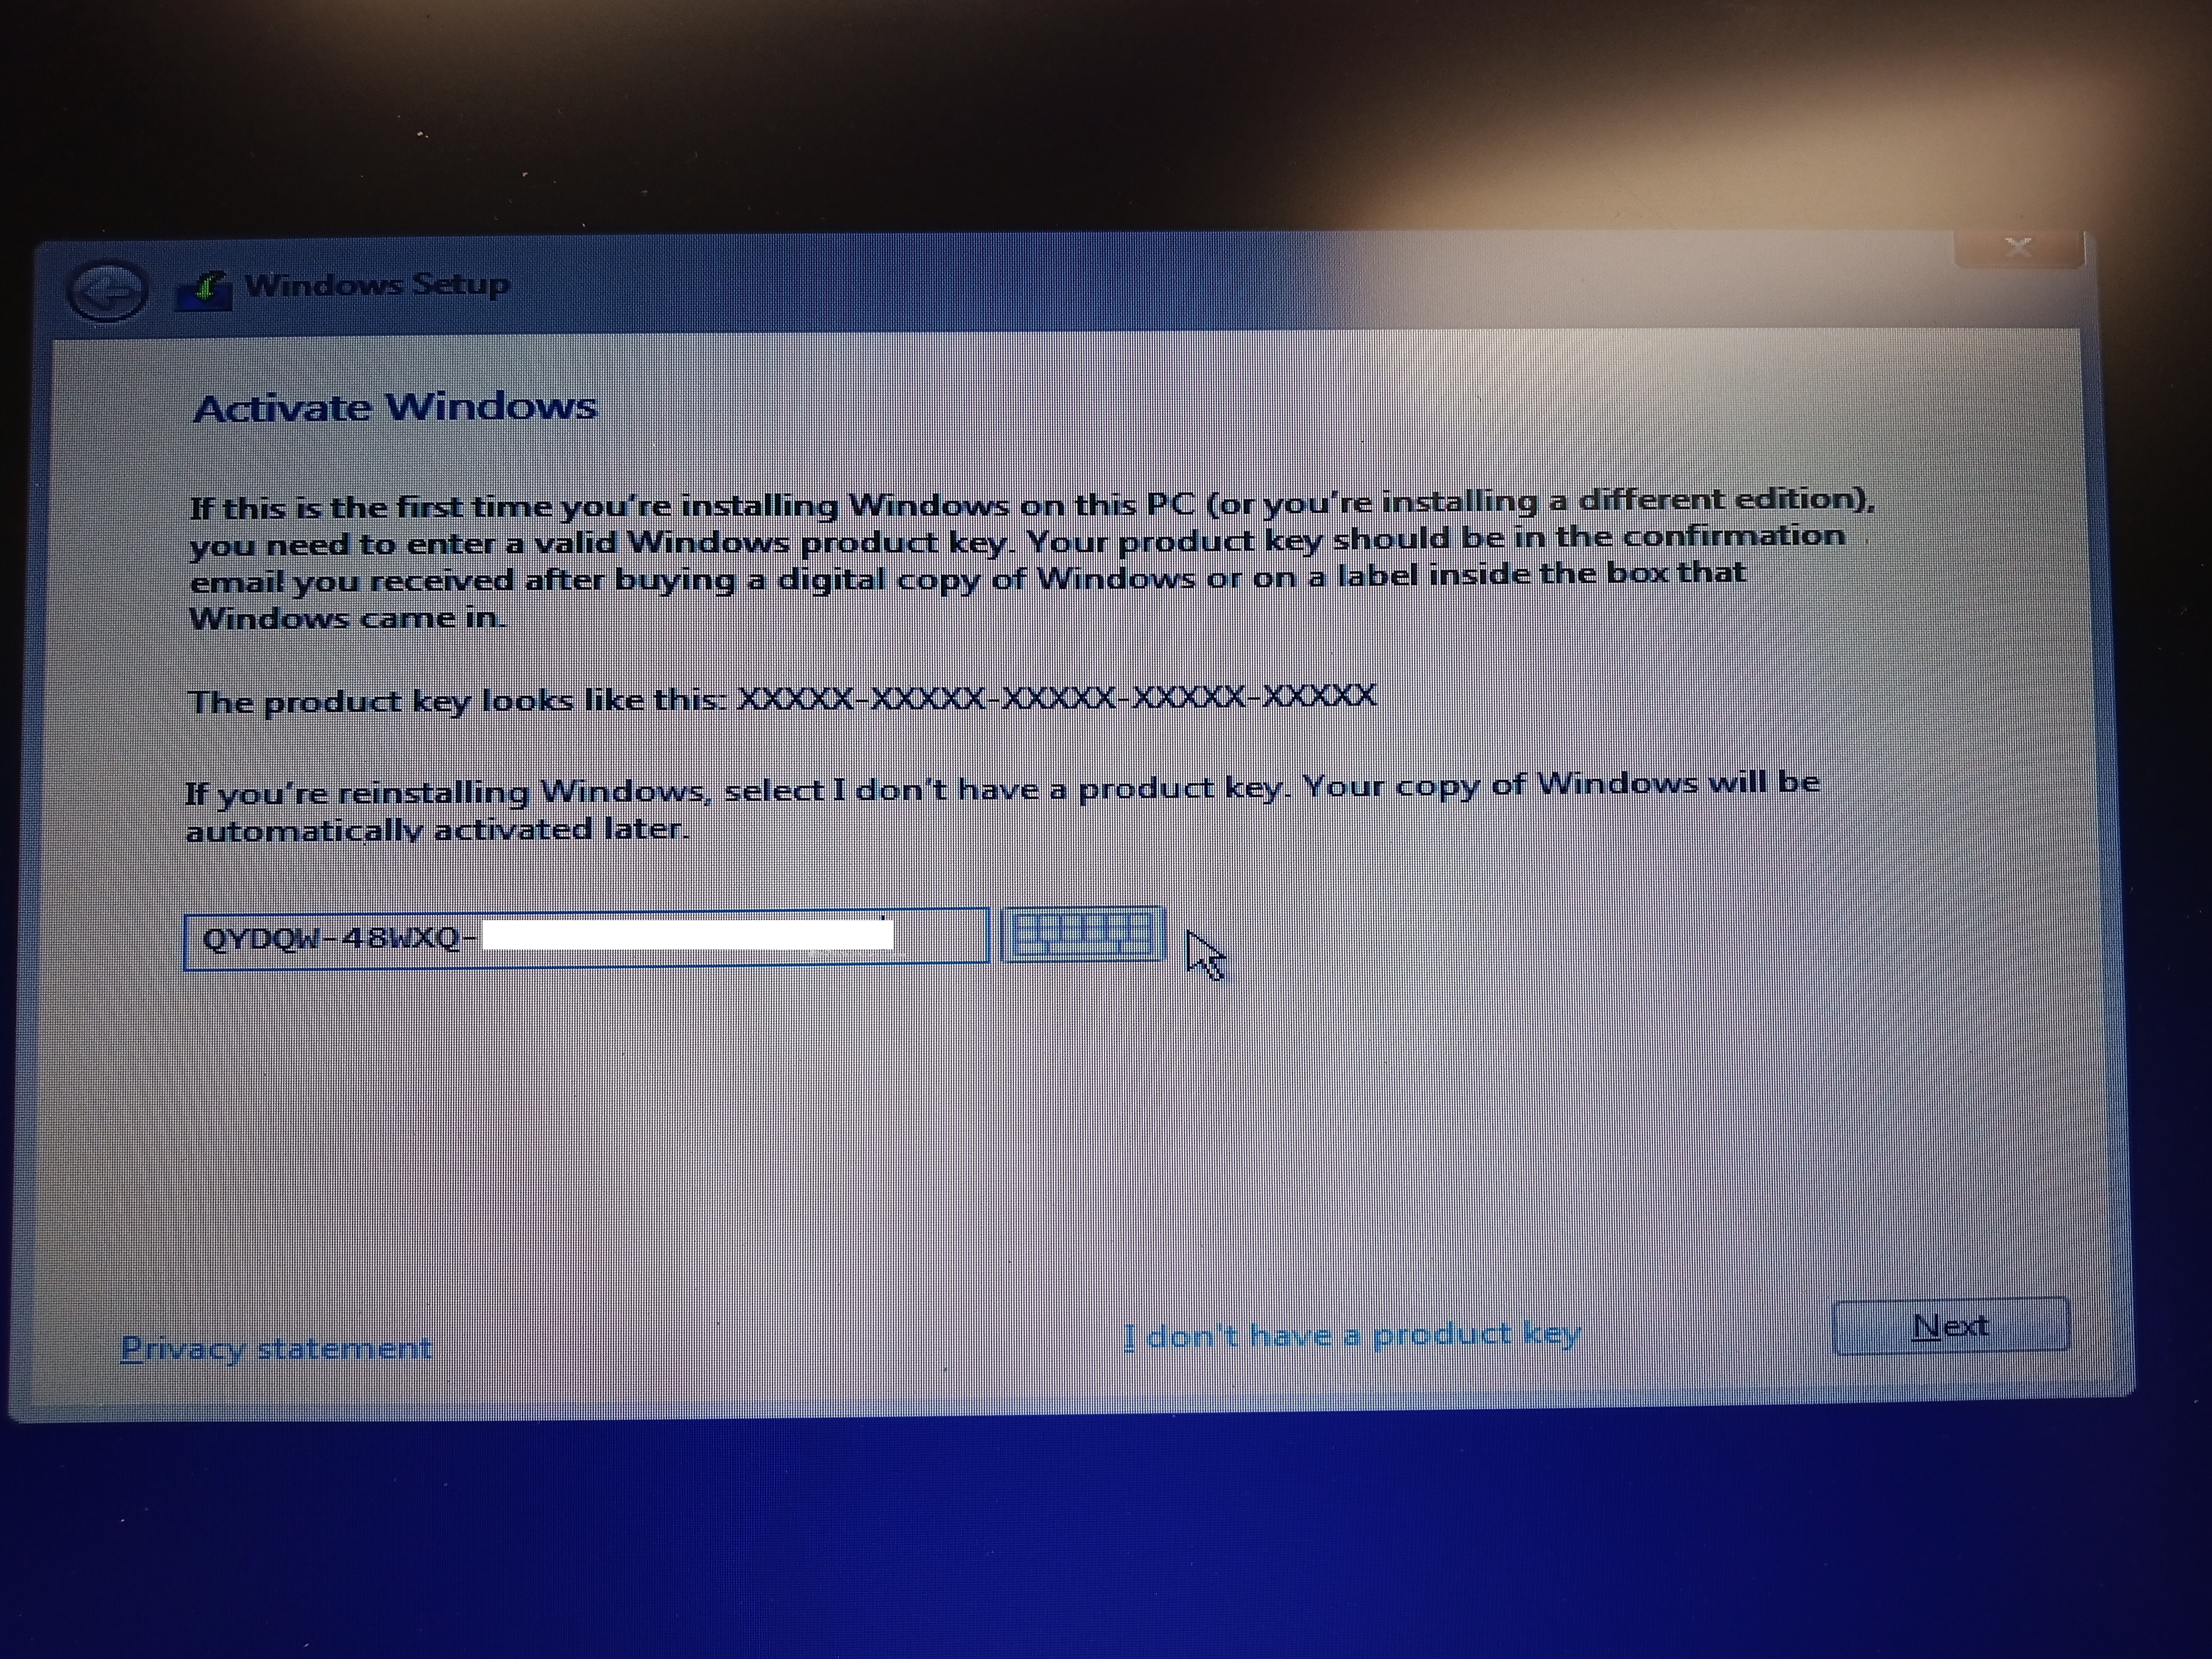
If you computer has a built in license key it will skip this part. Don’t worry if your key is not valid at this point if you enter it and get an error. You can re-enter it later after Windows 10 has installed.
The next screen to AGREE TO THE LICENSE, check box it and click NEXT.
This brings you to the UPGRADE or CUSTOM INTALL screen. I would go with the CUSTOM INSTALL in ALL circustances where I have all of my critical software like Microsoft Office and its keys. Only do and UPGRADE if you have software on there , you absolutelly cannot lose, for instance, and 2015 Version of Quickbooks and you do not have the License and the original installation files.
Be warned, most software companies will not help you re-install any software that is out of warranty or over 2 years old, and is out of free technical support unless you either pay for technical support or an upgrade license.
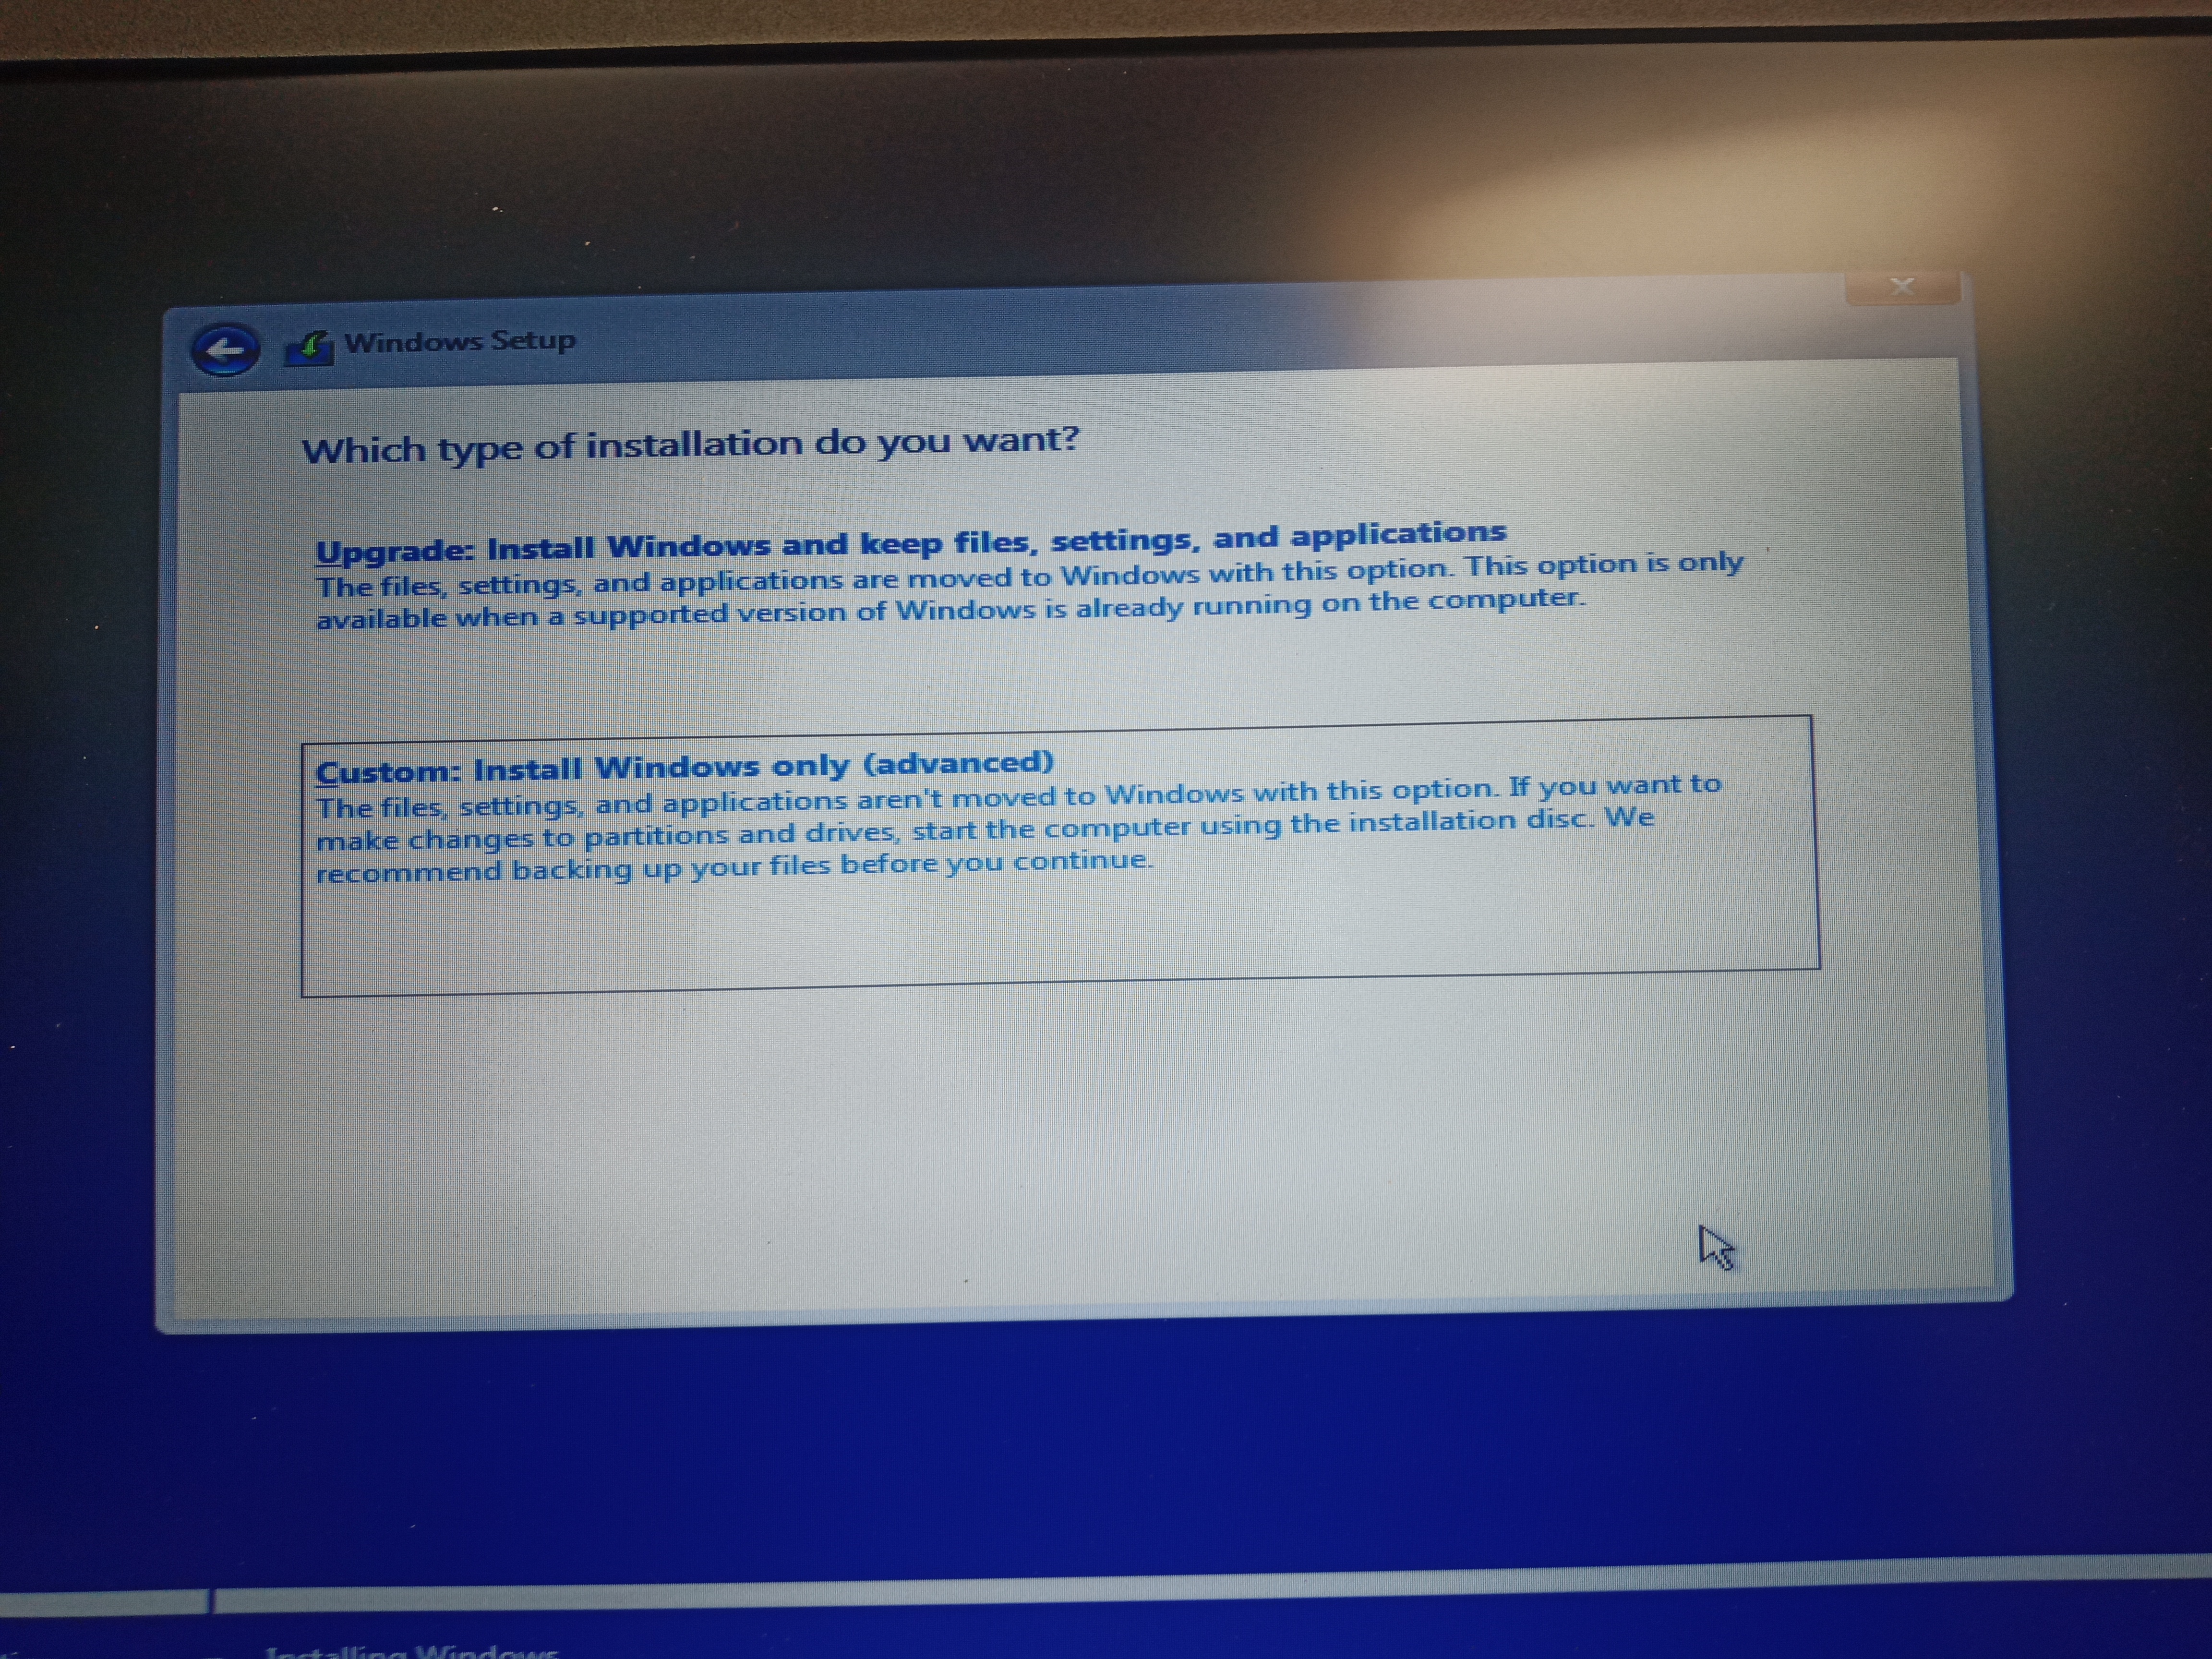
I am going to perform a CLEAN INSTALL, which I recommend because I have all my licenses and my software to re-install from scratch. A clean install is ALWAYS better if you have good backups because it will not import legacy Windows 7 components which may cause Windows to run slow or crash, and lets you start off FRESH in case maybe viruses had ruined your computer in the past , and you want to make sure you are not compromised.
CAUTION!! Read the whole paragraph below first before continuing! You have been warned!
If you are sure you have all your data backed up, then do this next. If not, eject the drive or DVD now and hold the power key down and restart the computer. You old Windows is still there until YOU DELETE THE PARTITION. After that, ALL DATA IS LOST! If you have your backup or don’t need it, then proceed to this next step.
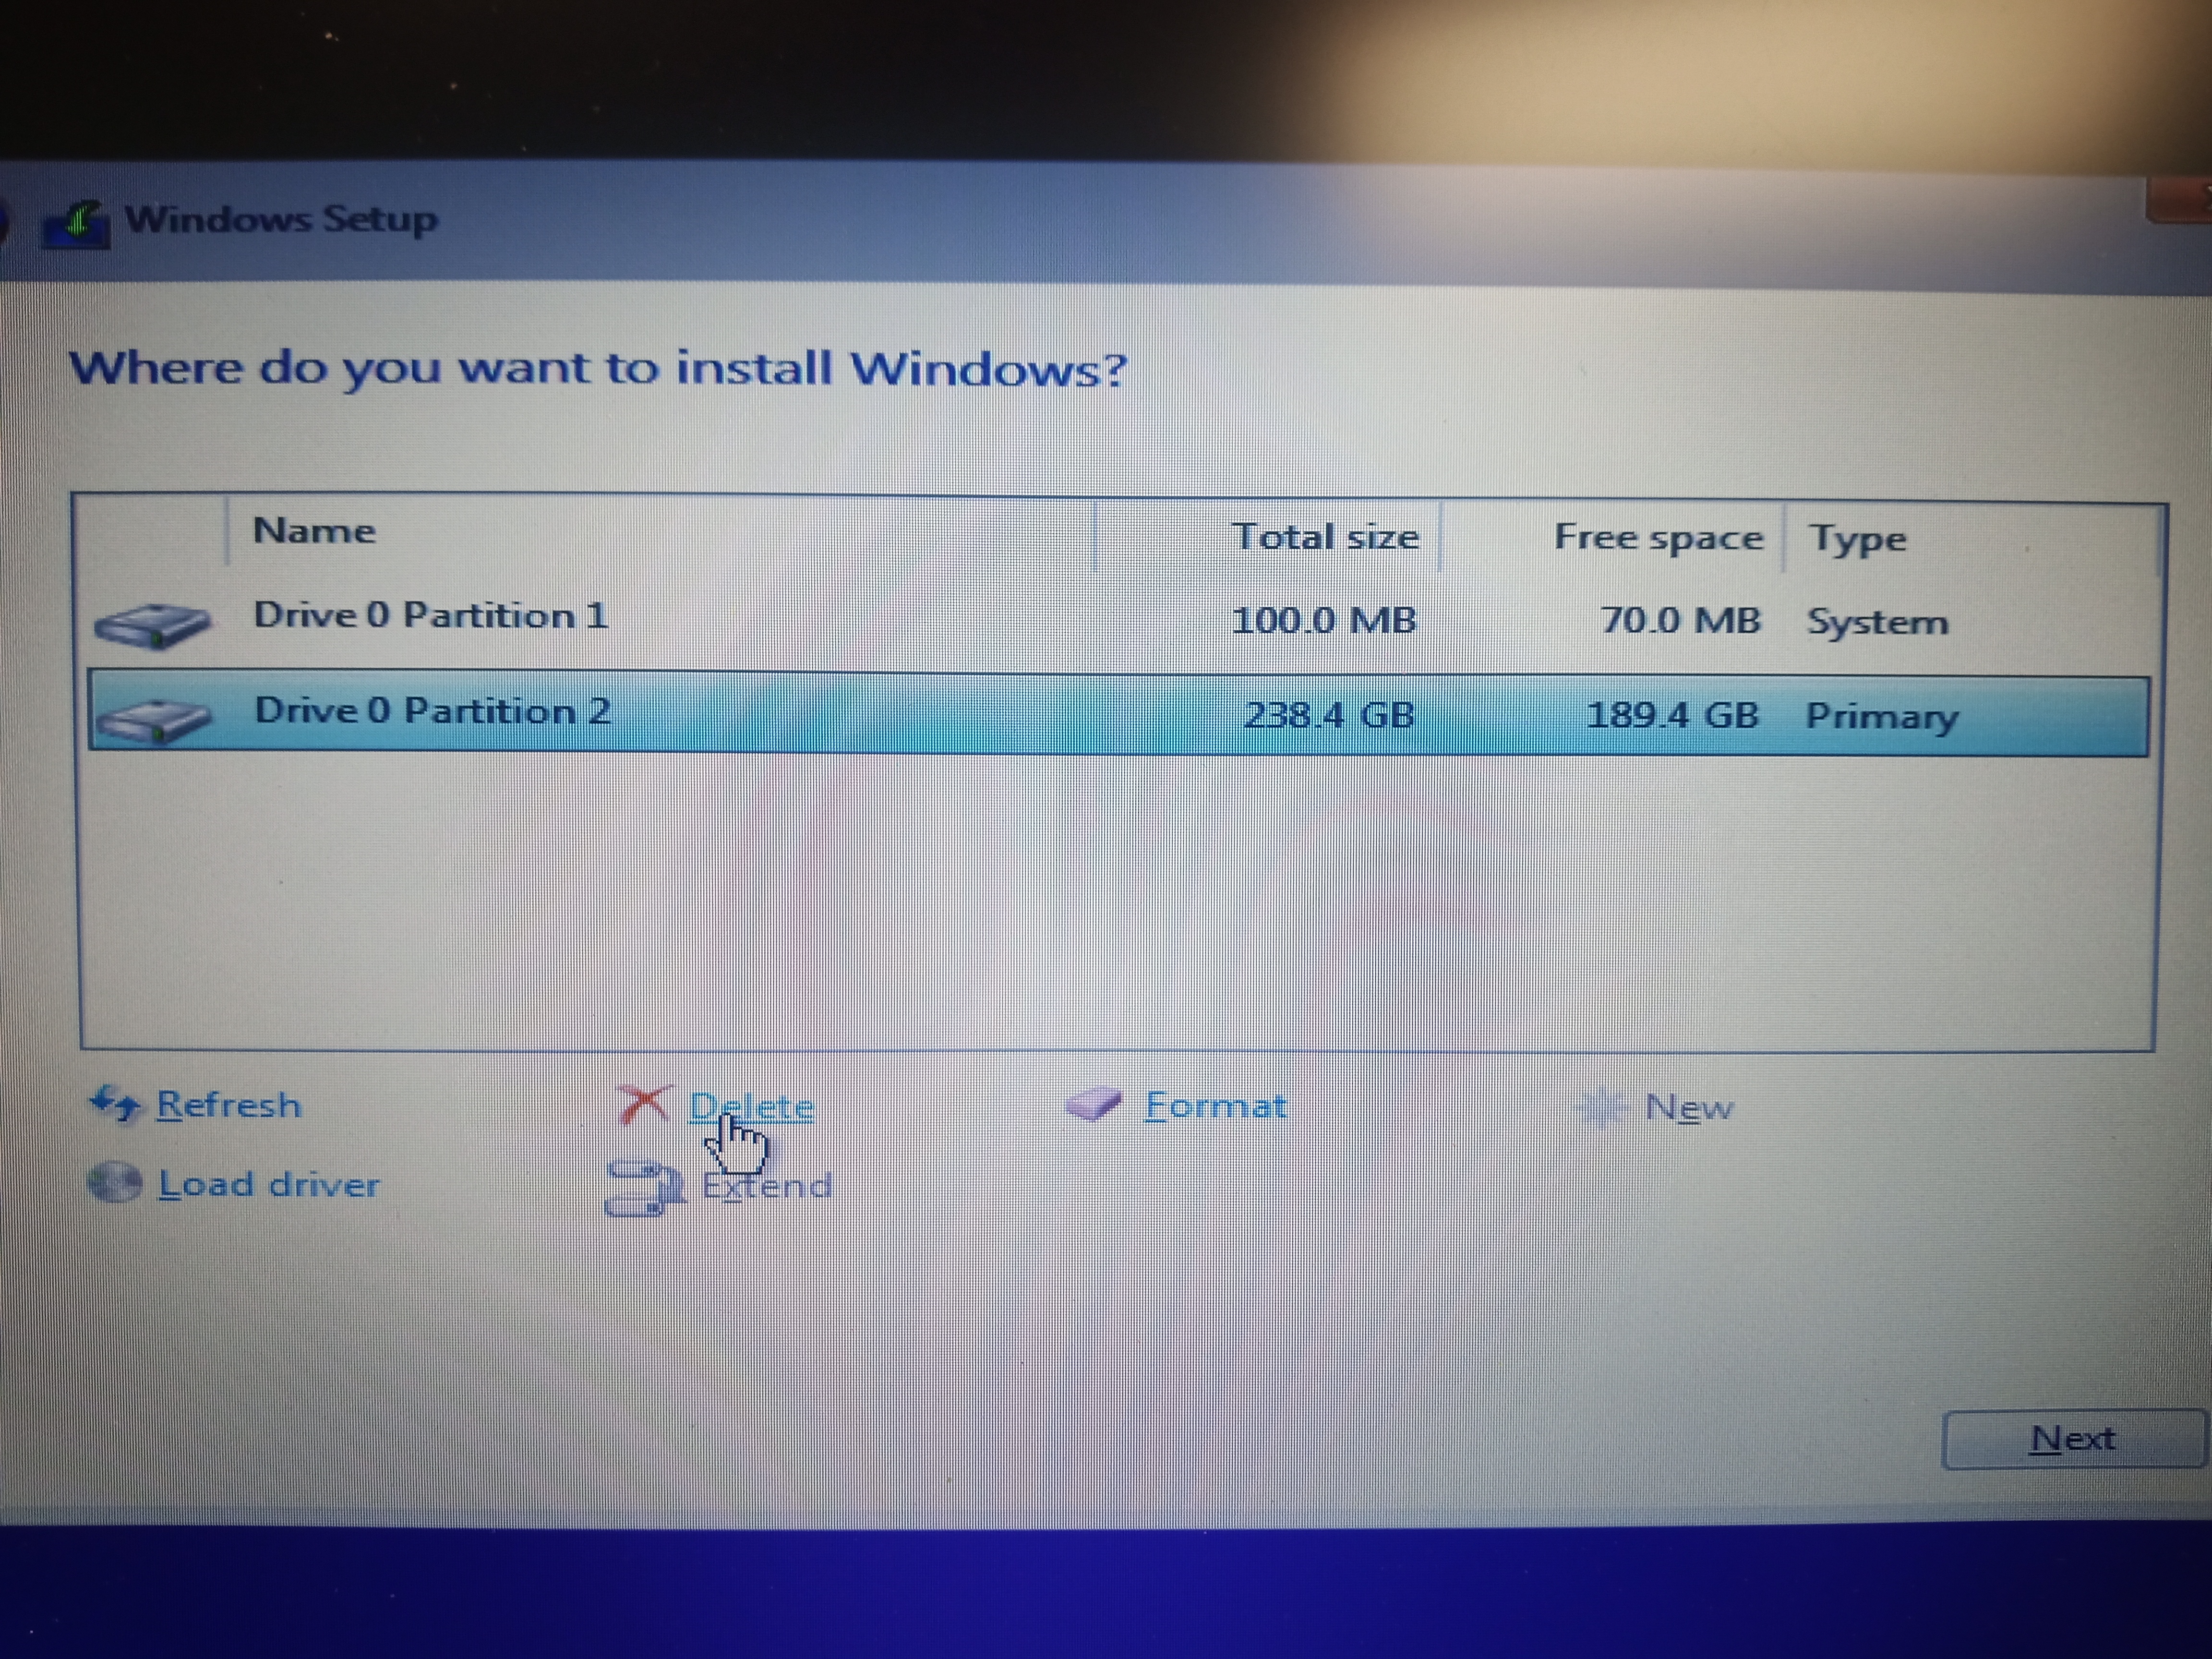
Next you are brought to the screen that shows your hard disk partitions. You will want to click on each one, highlight it and click DELETE. Do not worry about using the NEW or FORMAT options, just delete all your partitions on each drive and Windows 10 will create all the needed partitions and format the drive automatically for you. This will be the option you want. ONLY DO THIS IF YOU ARE SURE YOU HAVE YOUR BACKUPS AND DON’T WANT ANY DATA OFF THE COMPUTER AT THIS POINT! The data is unrecoverable after your click DELETE.
It will look like this once you delete your partitions.
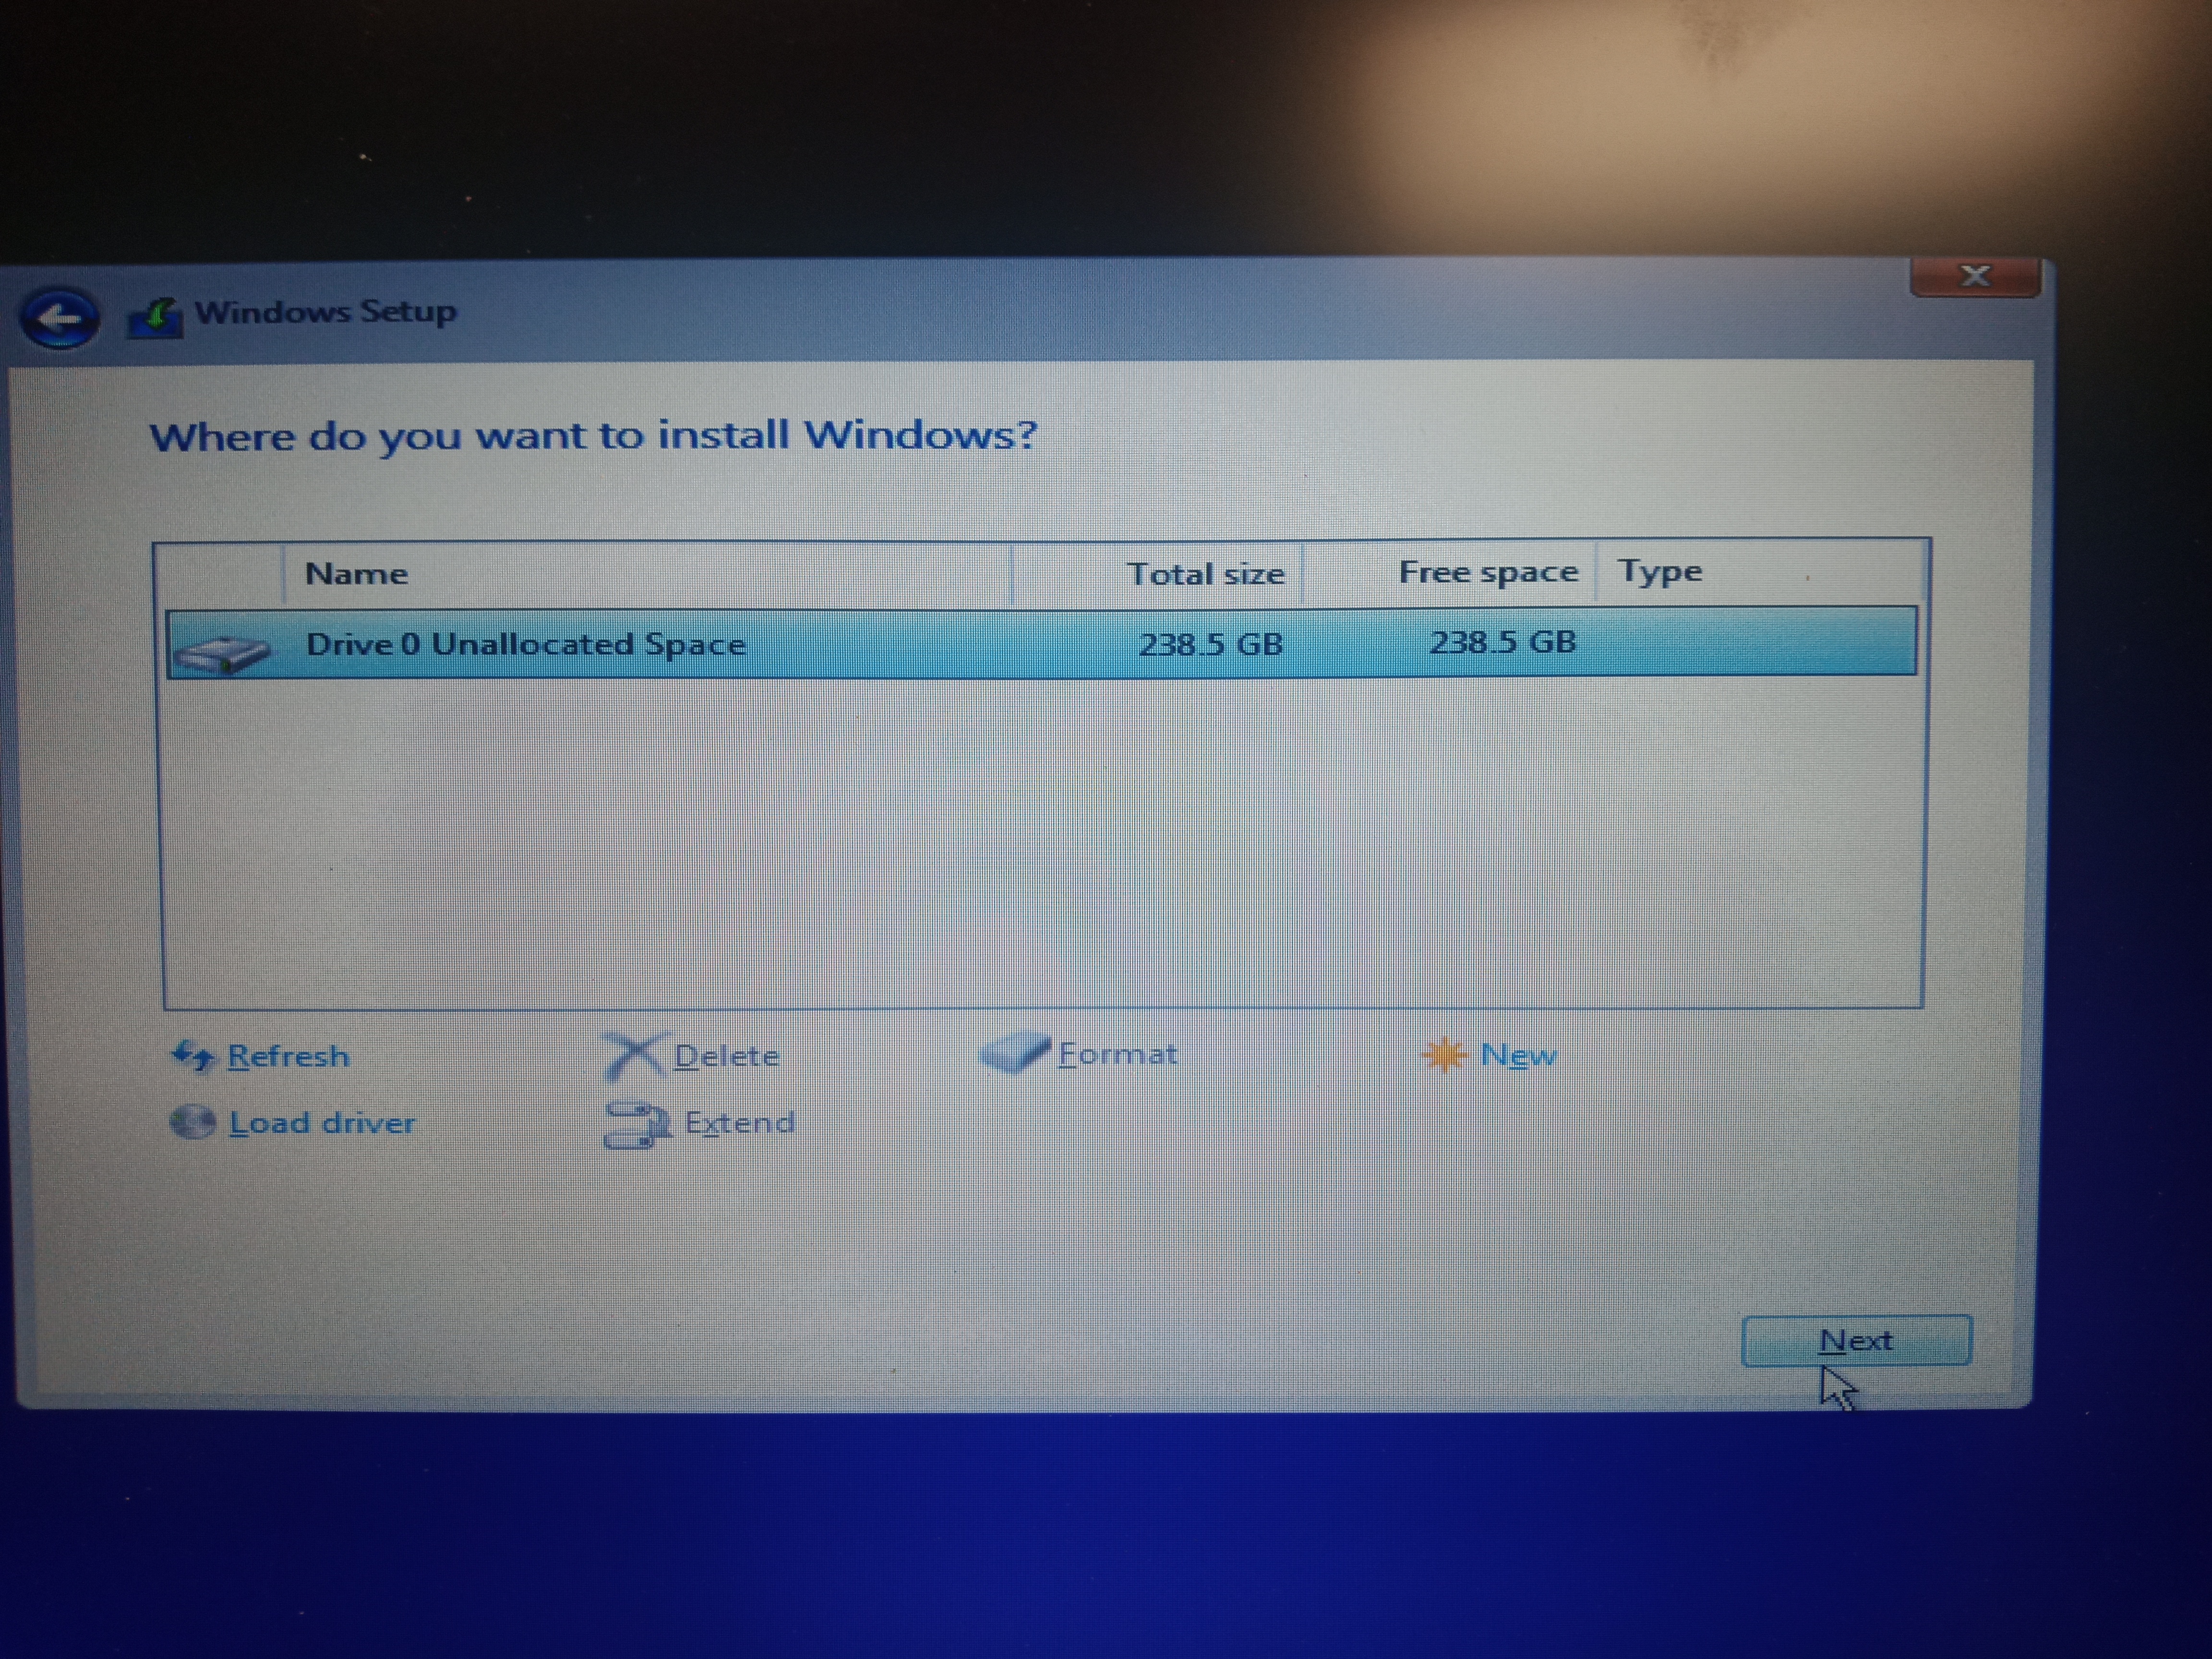
Windows 10 will now take the UNALLOCATED SPACE , 238.6 GB , (250GB hard disk, don’t worry about size discrepancy) , and it will overwrite ALL the blank space and allocate it for Windows 10.
Click NEXT, and off we go, Windows 10 will start to install the files needed. This could take sometime, usually about 15 to 30 minutes.
…..tick …..tock …………………..Ok, when its done , it will look like this……………………………
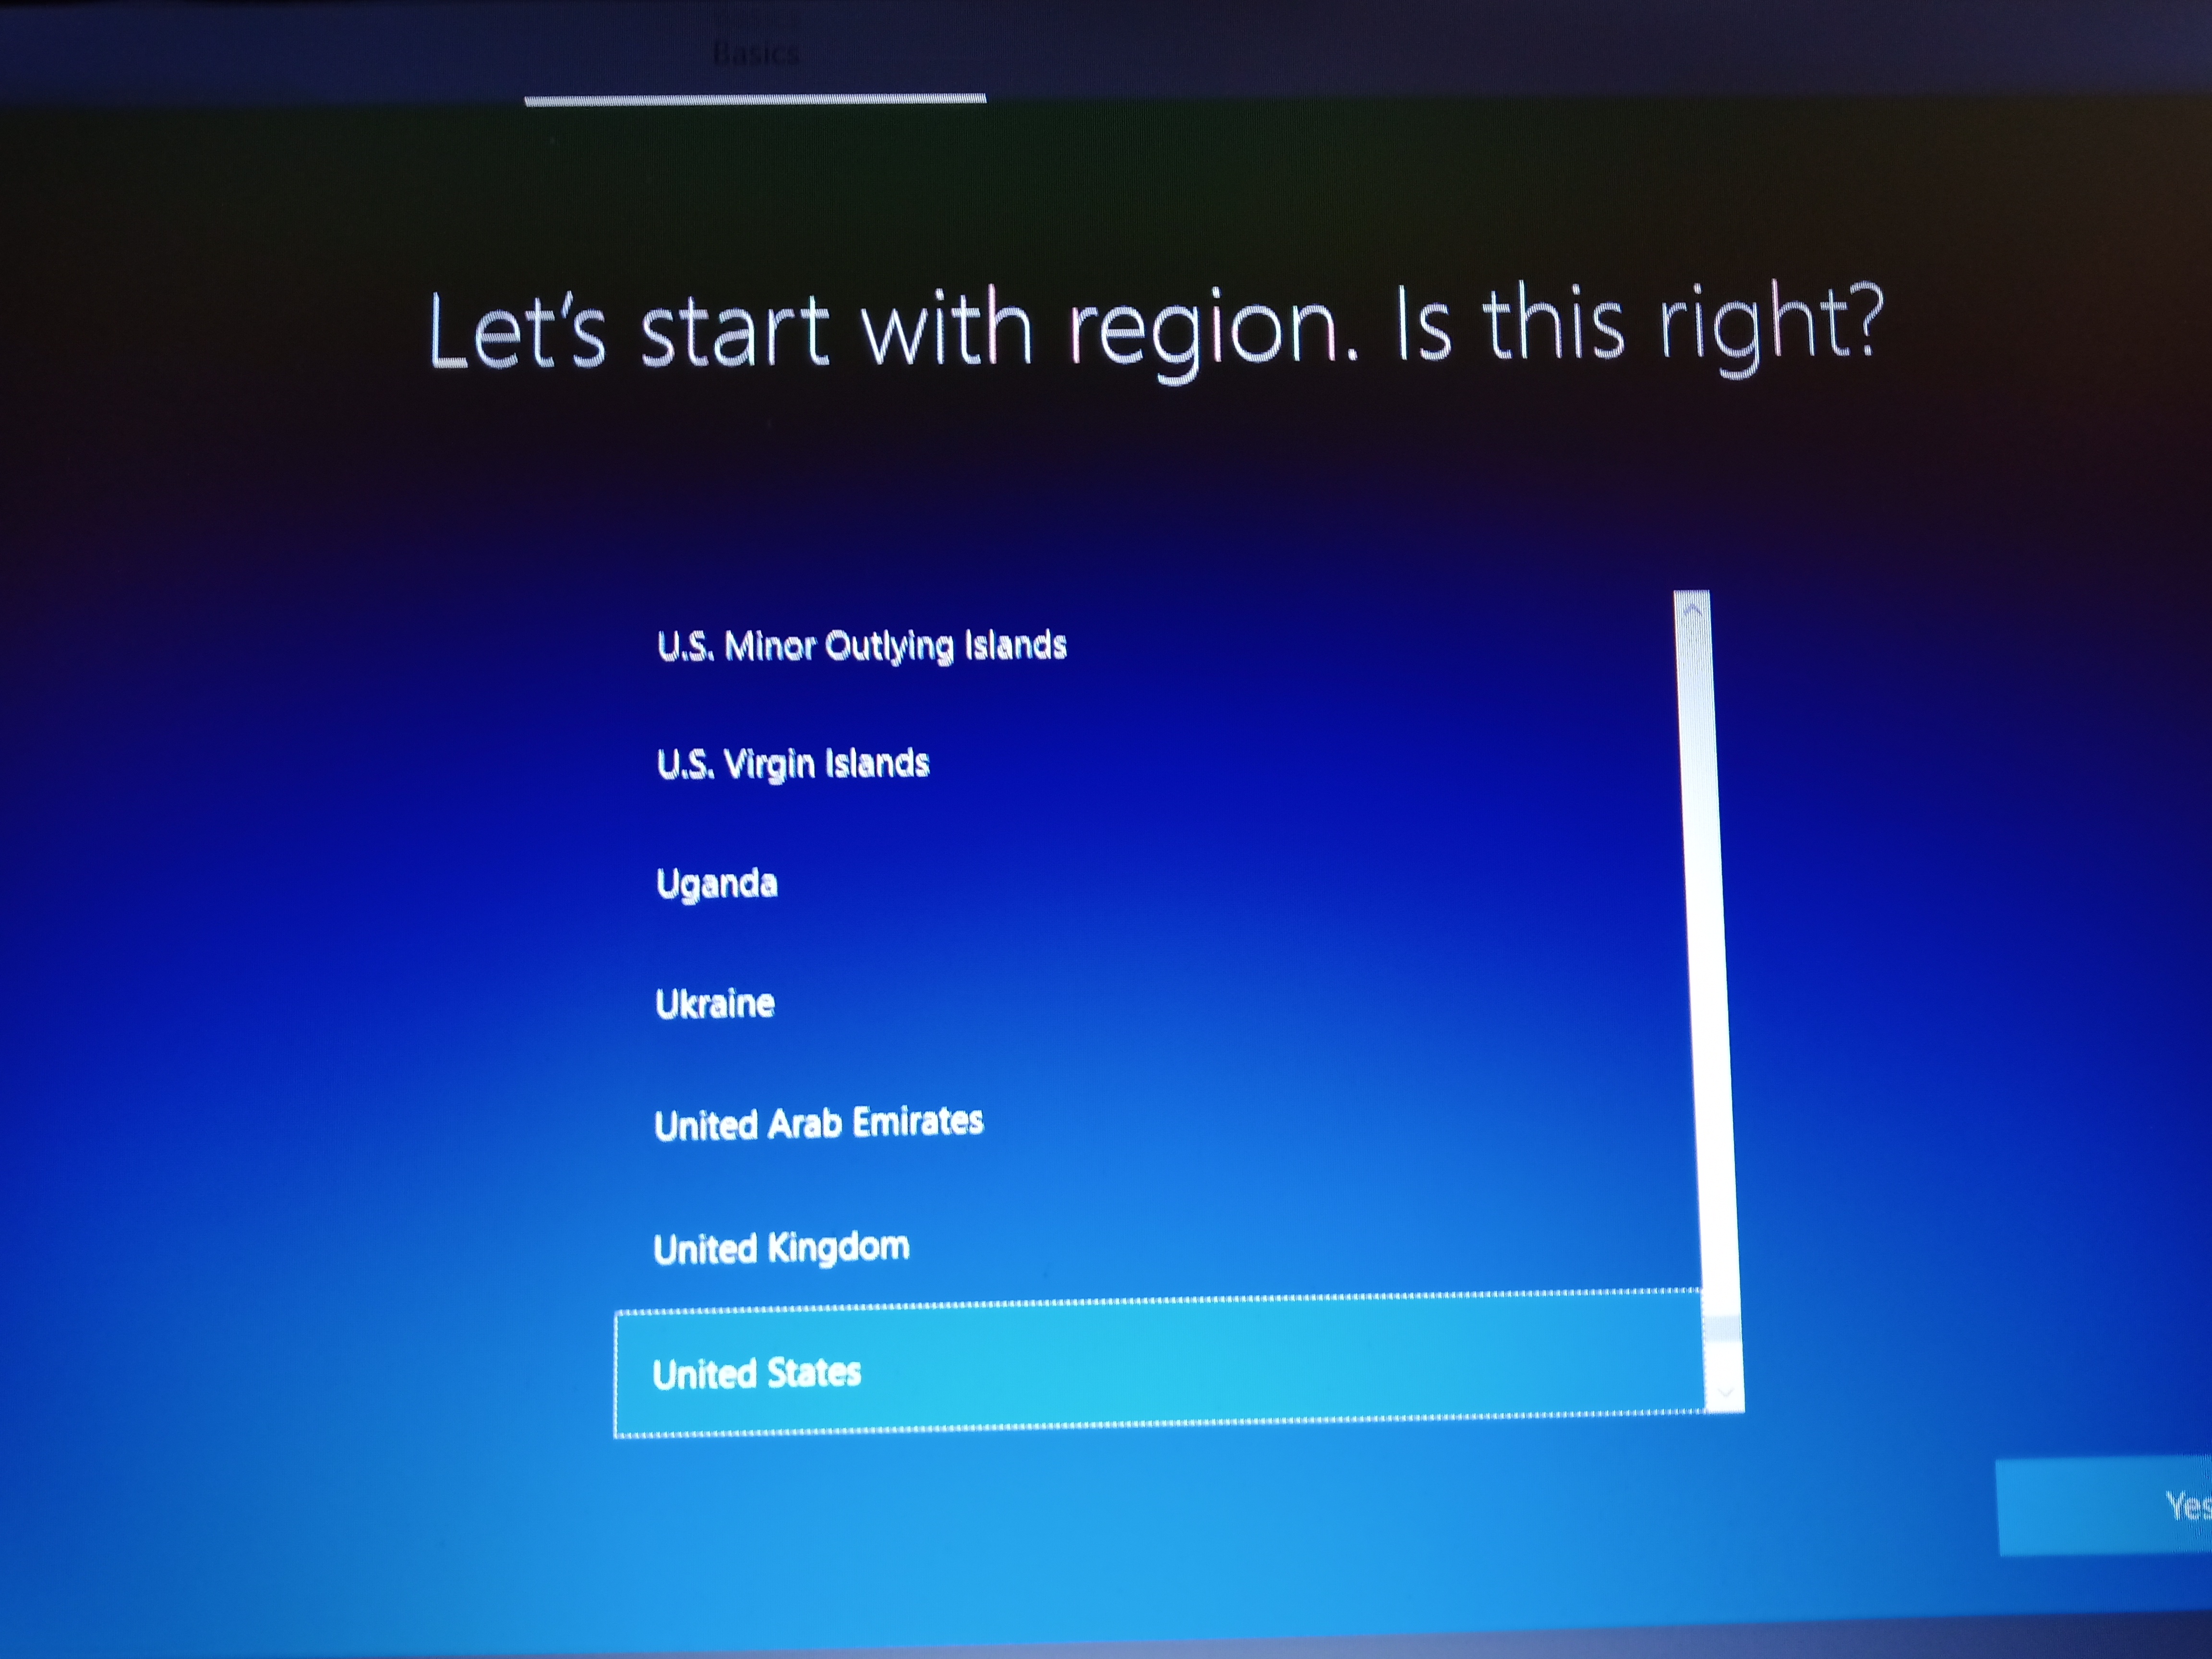
Choose your country. Click YES when the correct country is highlighted.
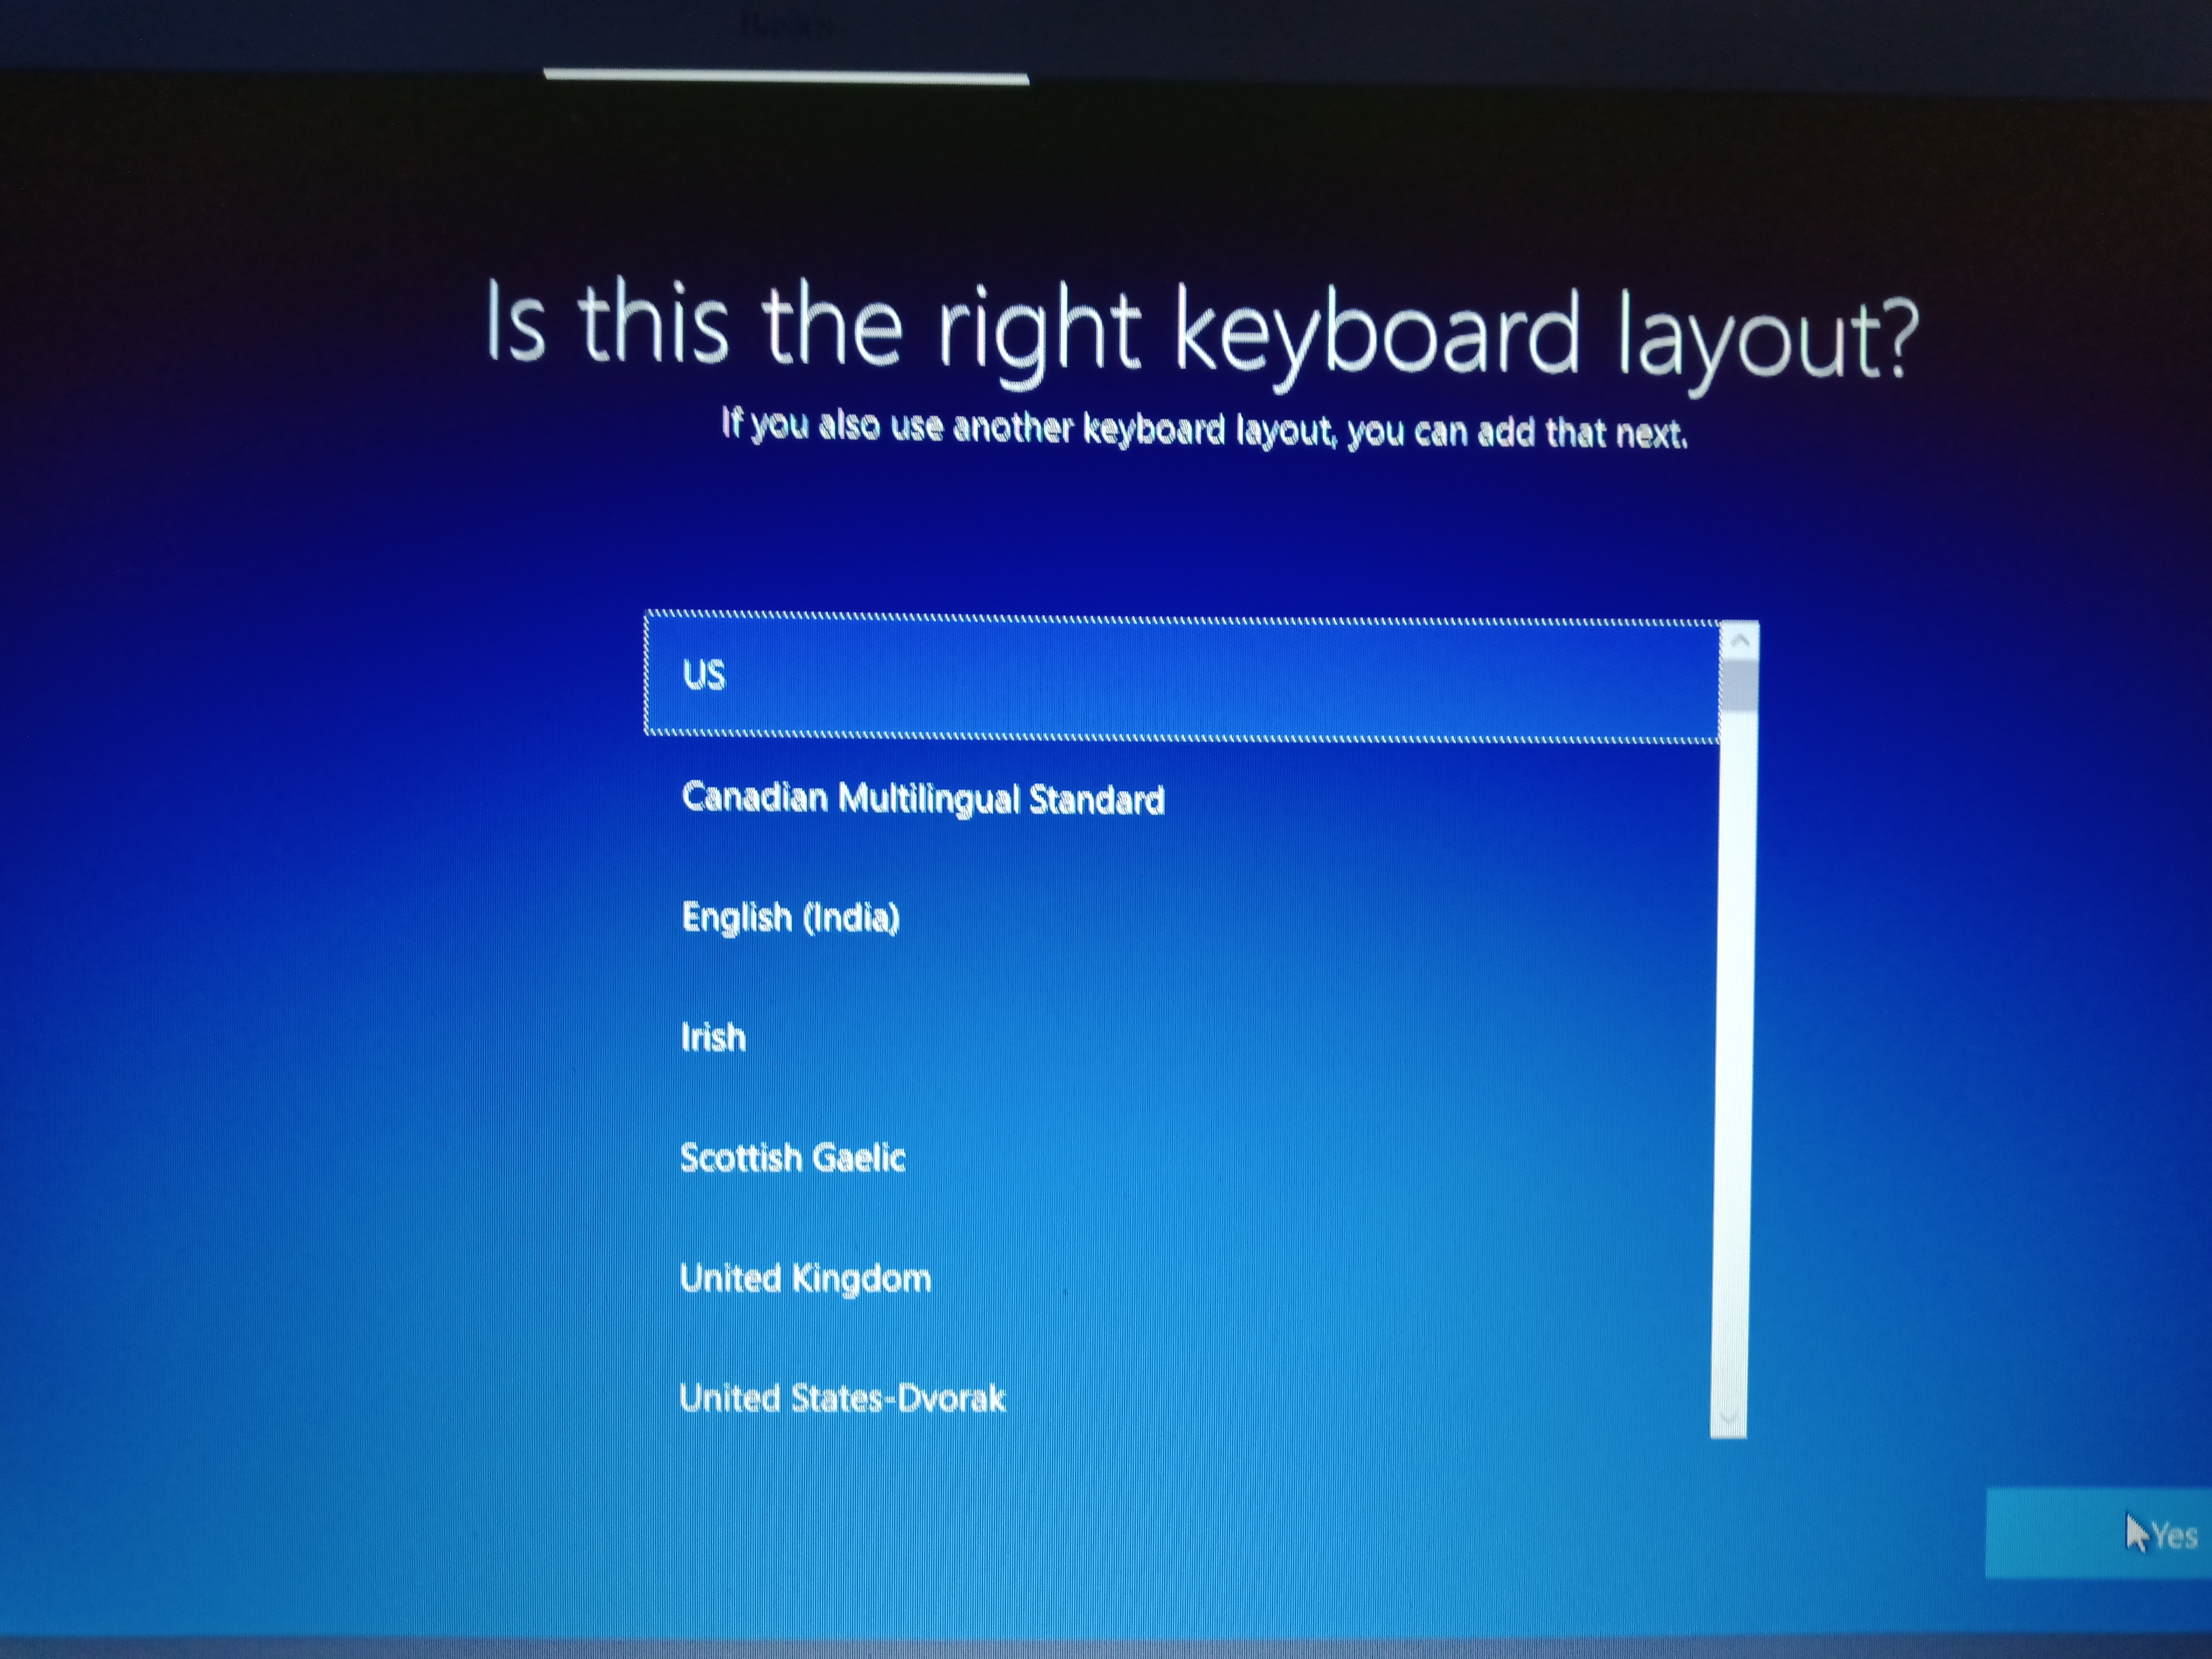
Choose keyboard layout, and then SKIP for the additional layout. You can always add languages later.
It may take a minute for the computer to goto the next screen but what you do next is important.
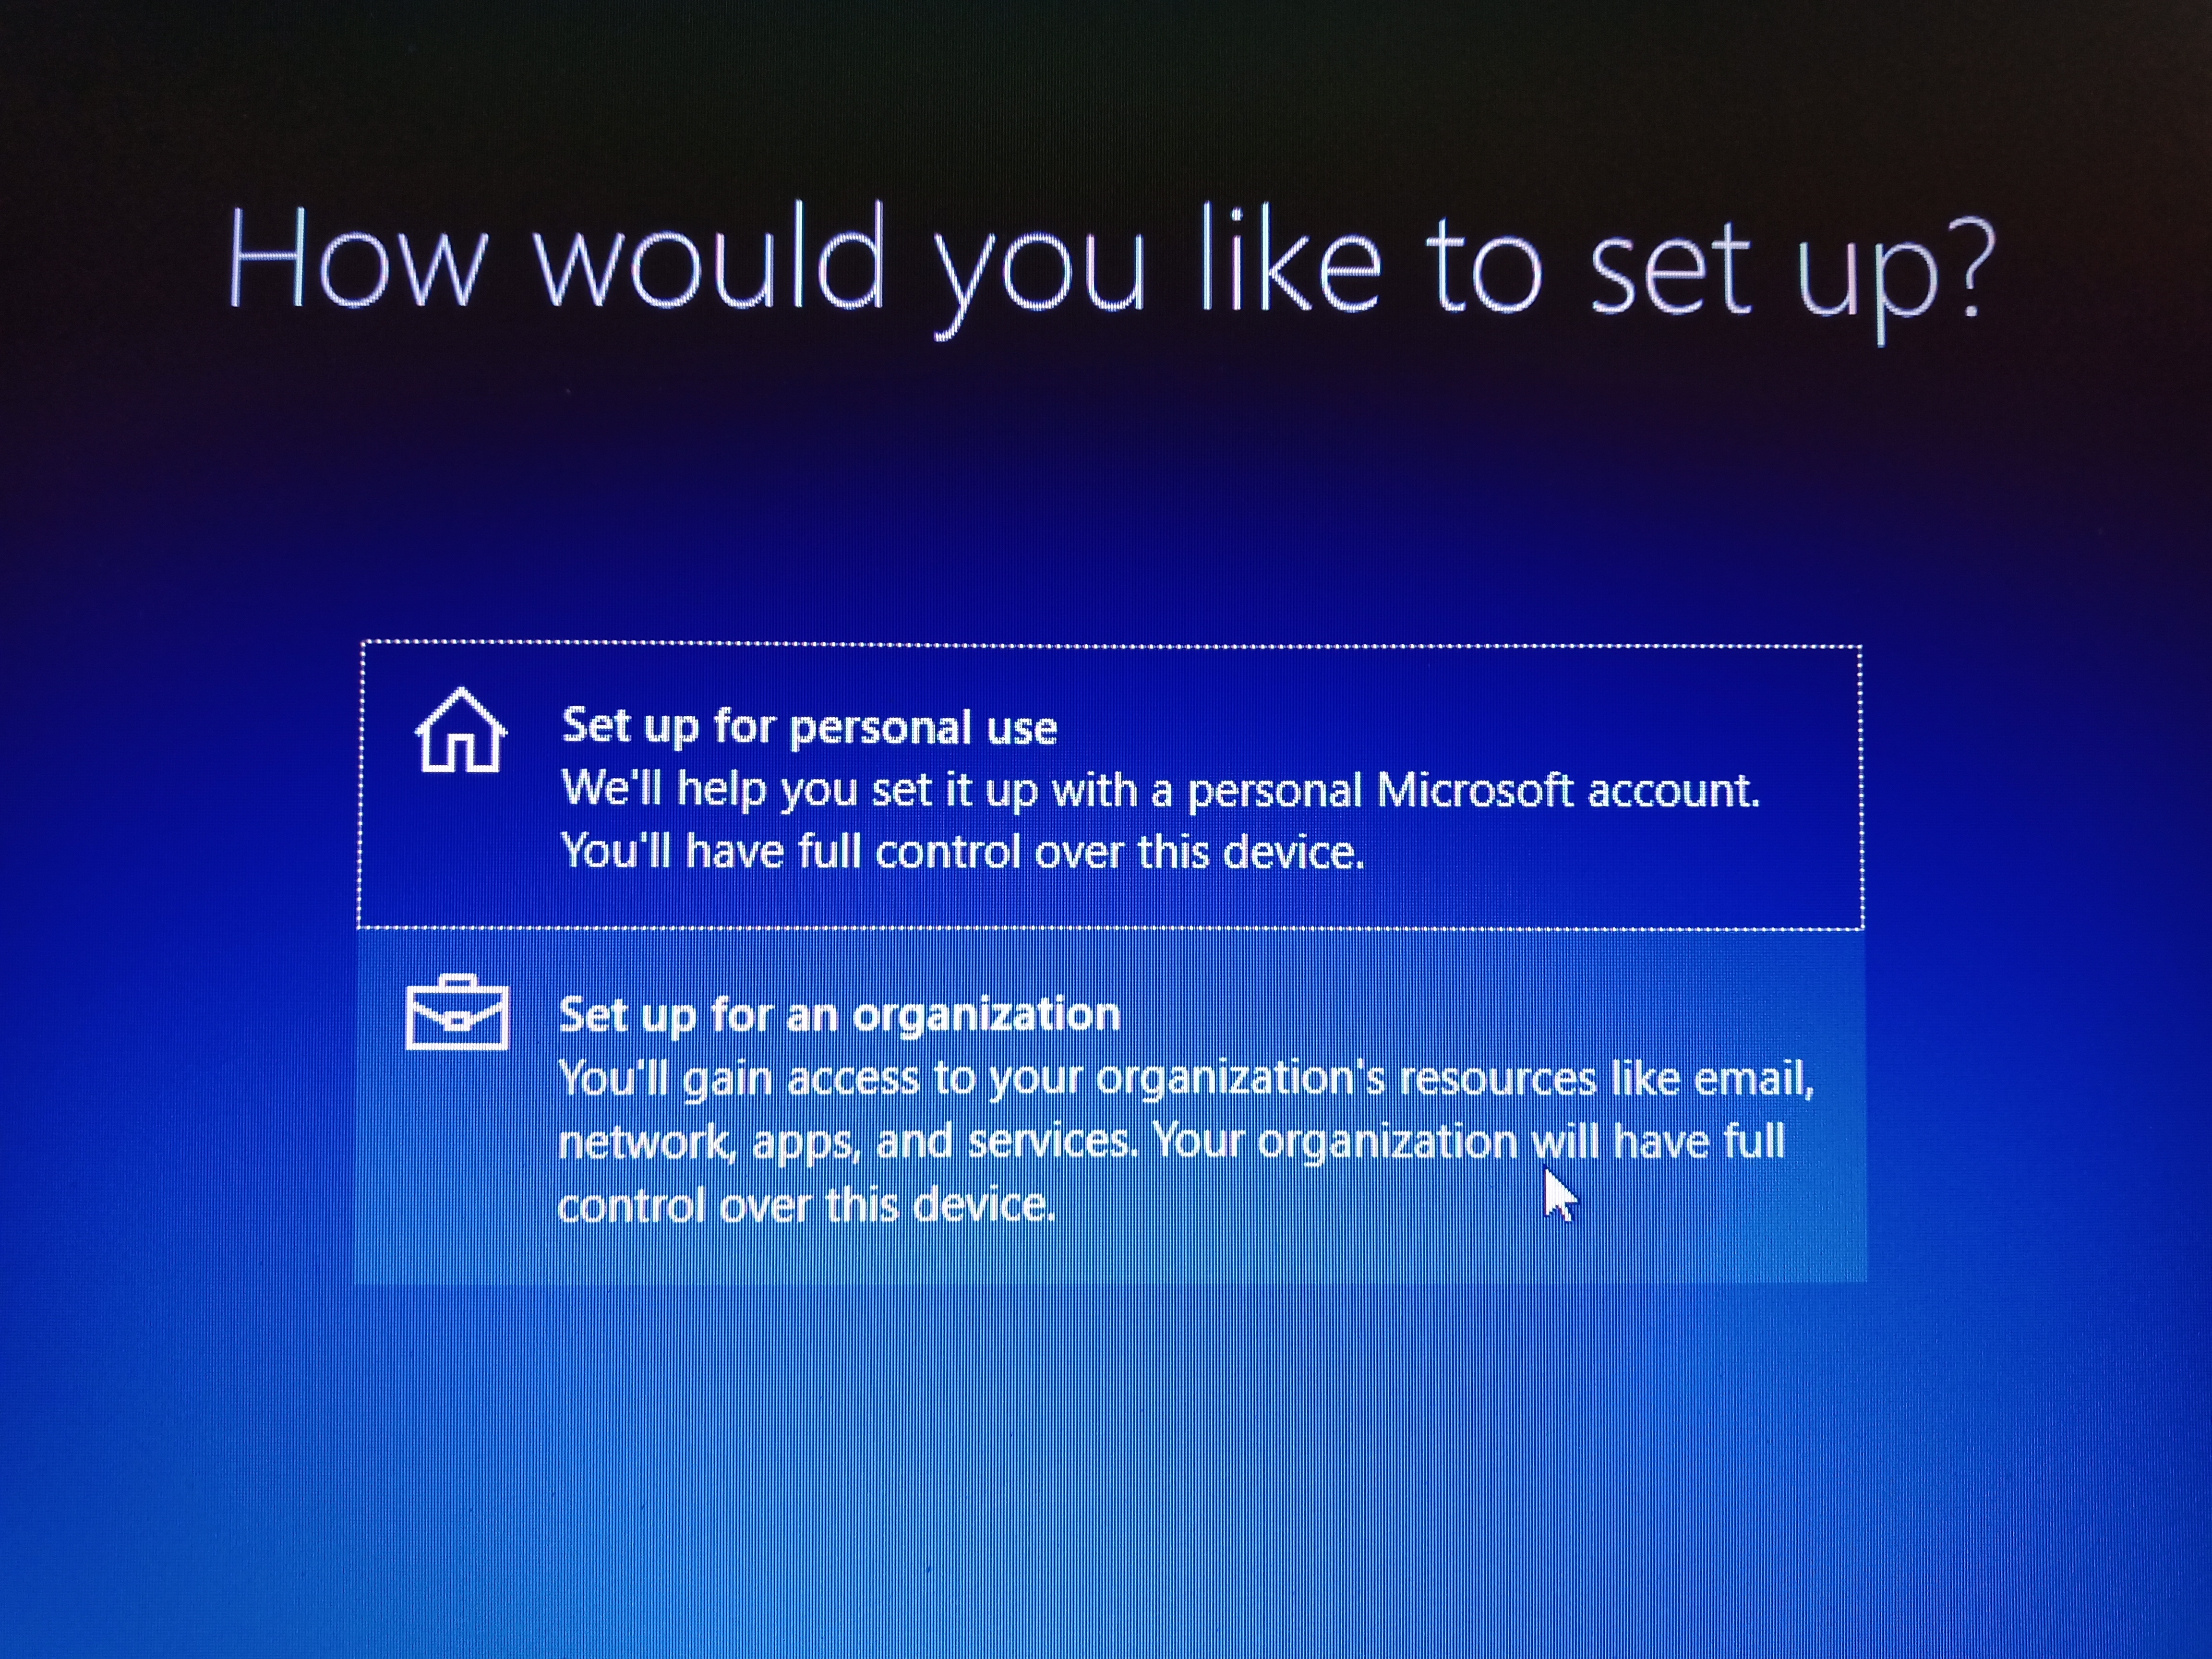
Because SPACECITY TECH’s do mostly business accounts we will choose “Set up for an Organization”, however, even if you are a home user, you still want to choose this.
If you see this setup for either personal or organization, at this point you know that it did upgrade you to Windows 10 Pro as the Home version does not allow setup for organizations.
Regardless, you don’t ever want to use a Microsoft account for setup. You want to use only LOCAL accounts which Microsoft says (NOT RECOMMENDED).
So we will chose, setup for an organization, or use LOCAL ACCOUNT which will be listed at the bottom and say (not recommended) . This is the old way of setting up windows and lets you setup a local ADMIN and password instead of going through Microsoft’s online control panel which will forever doom your Windows installation to be tied to a Microsoft account.
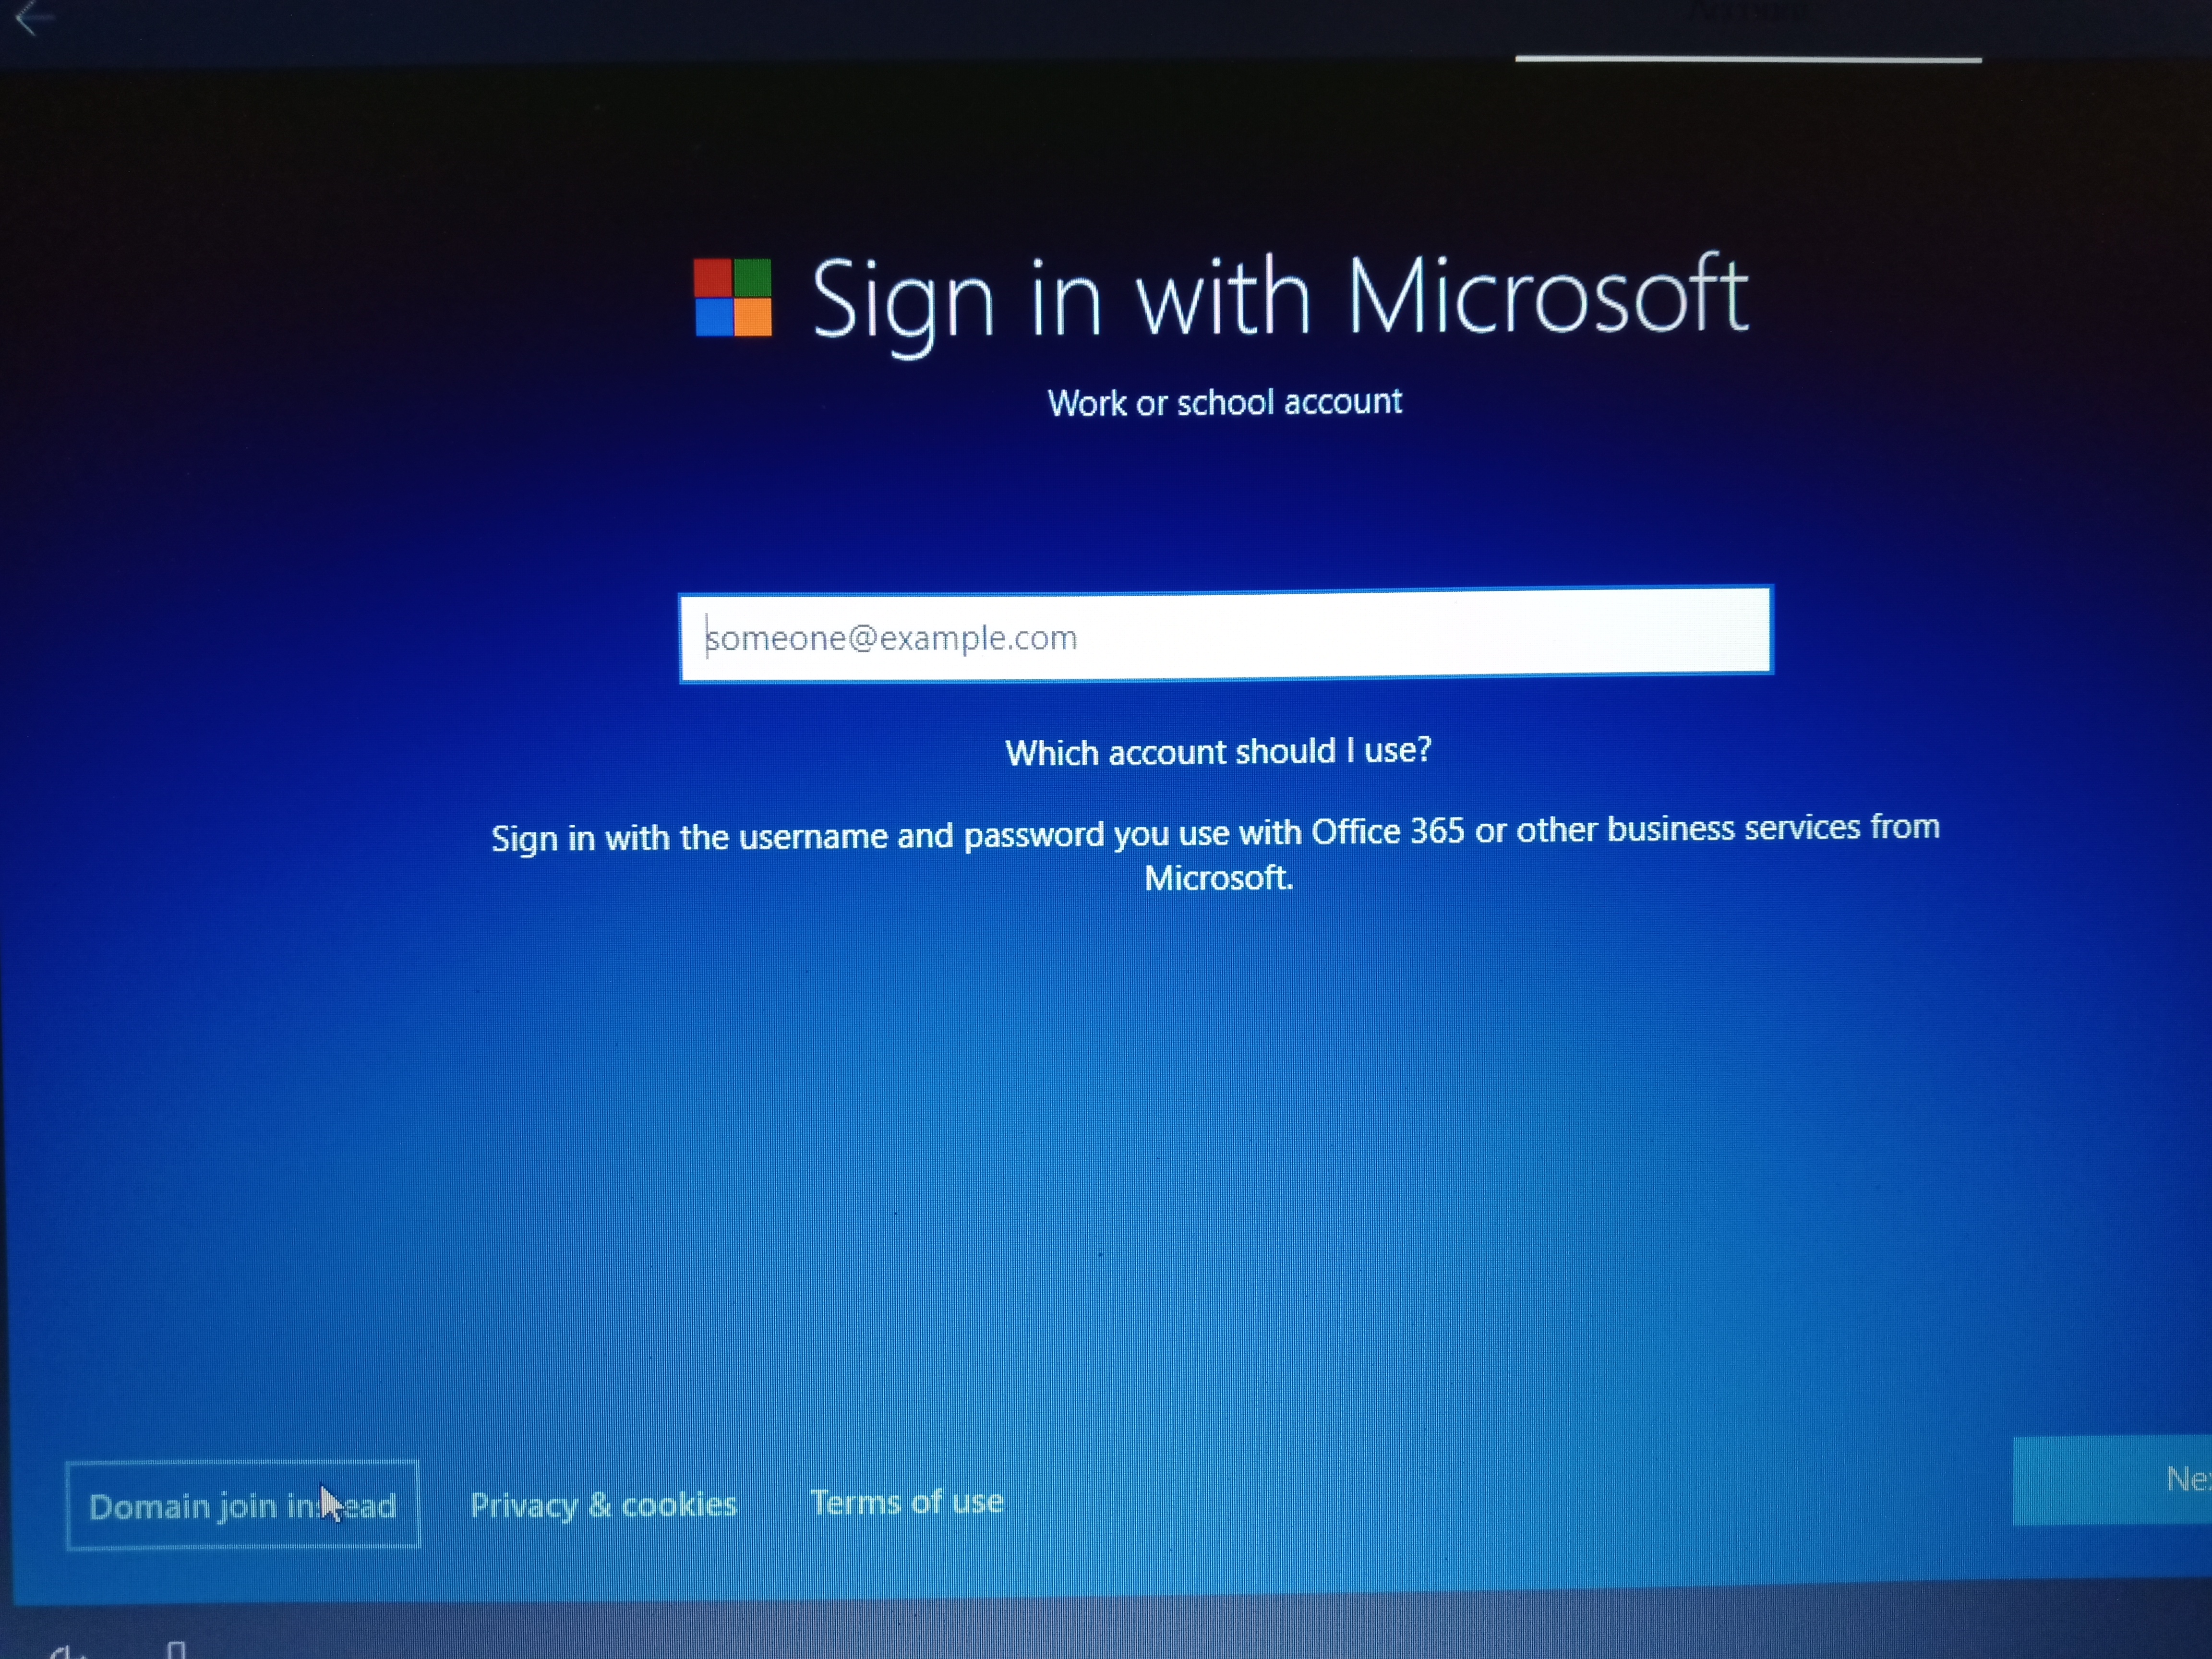
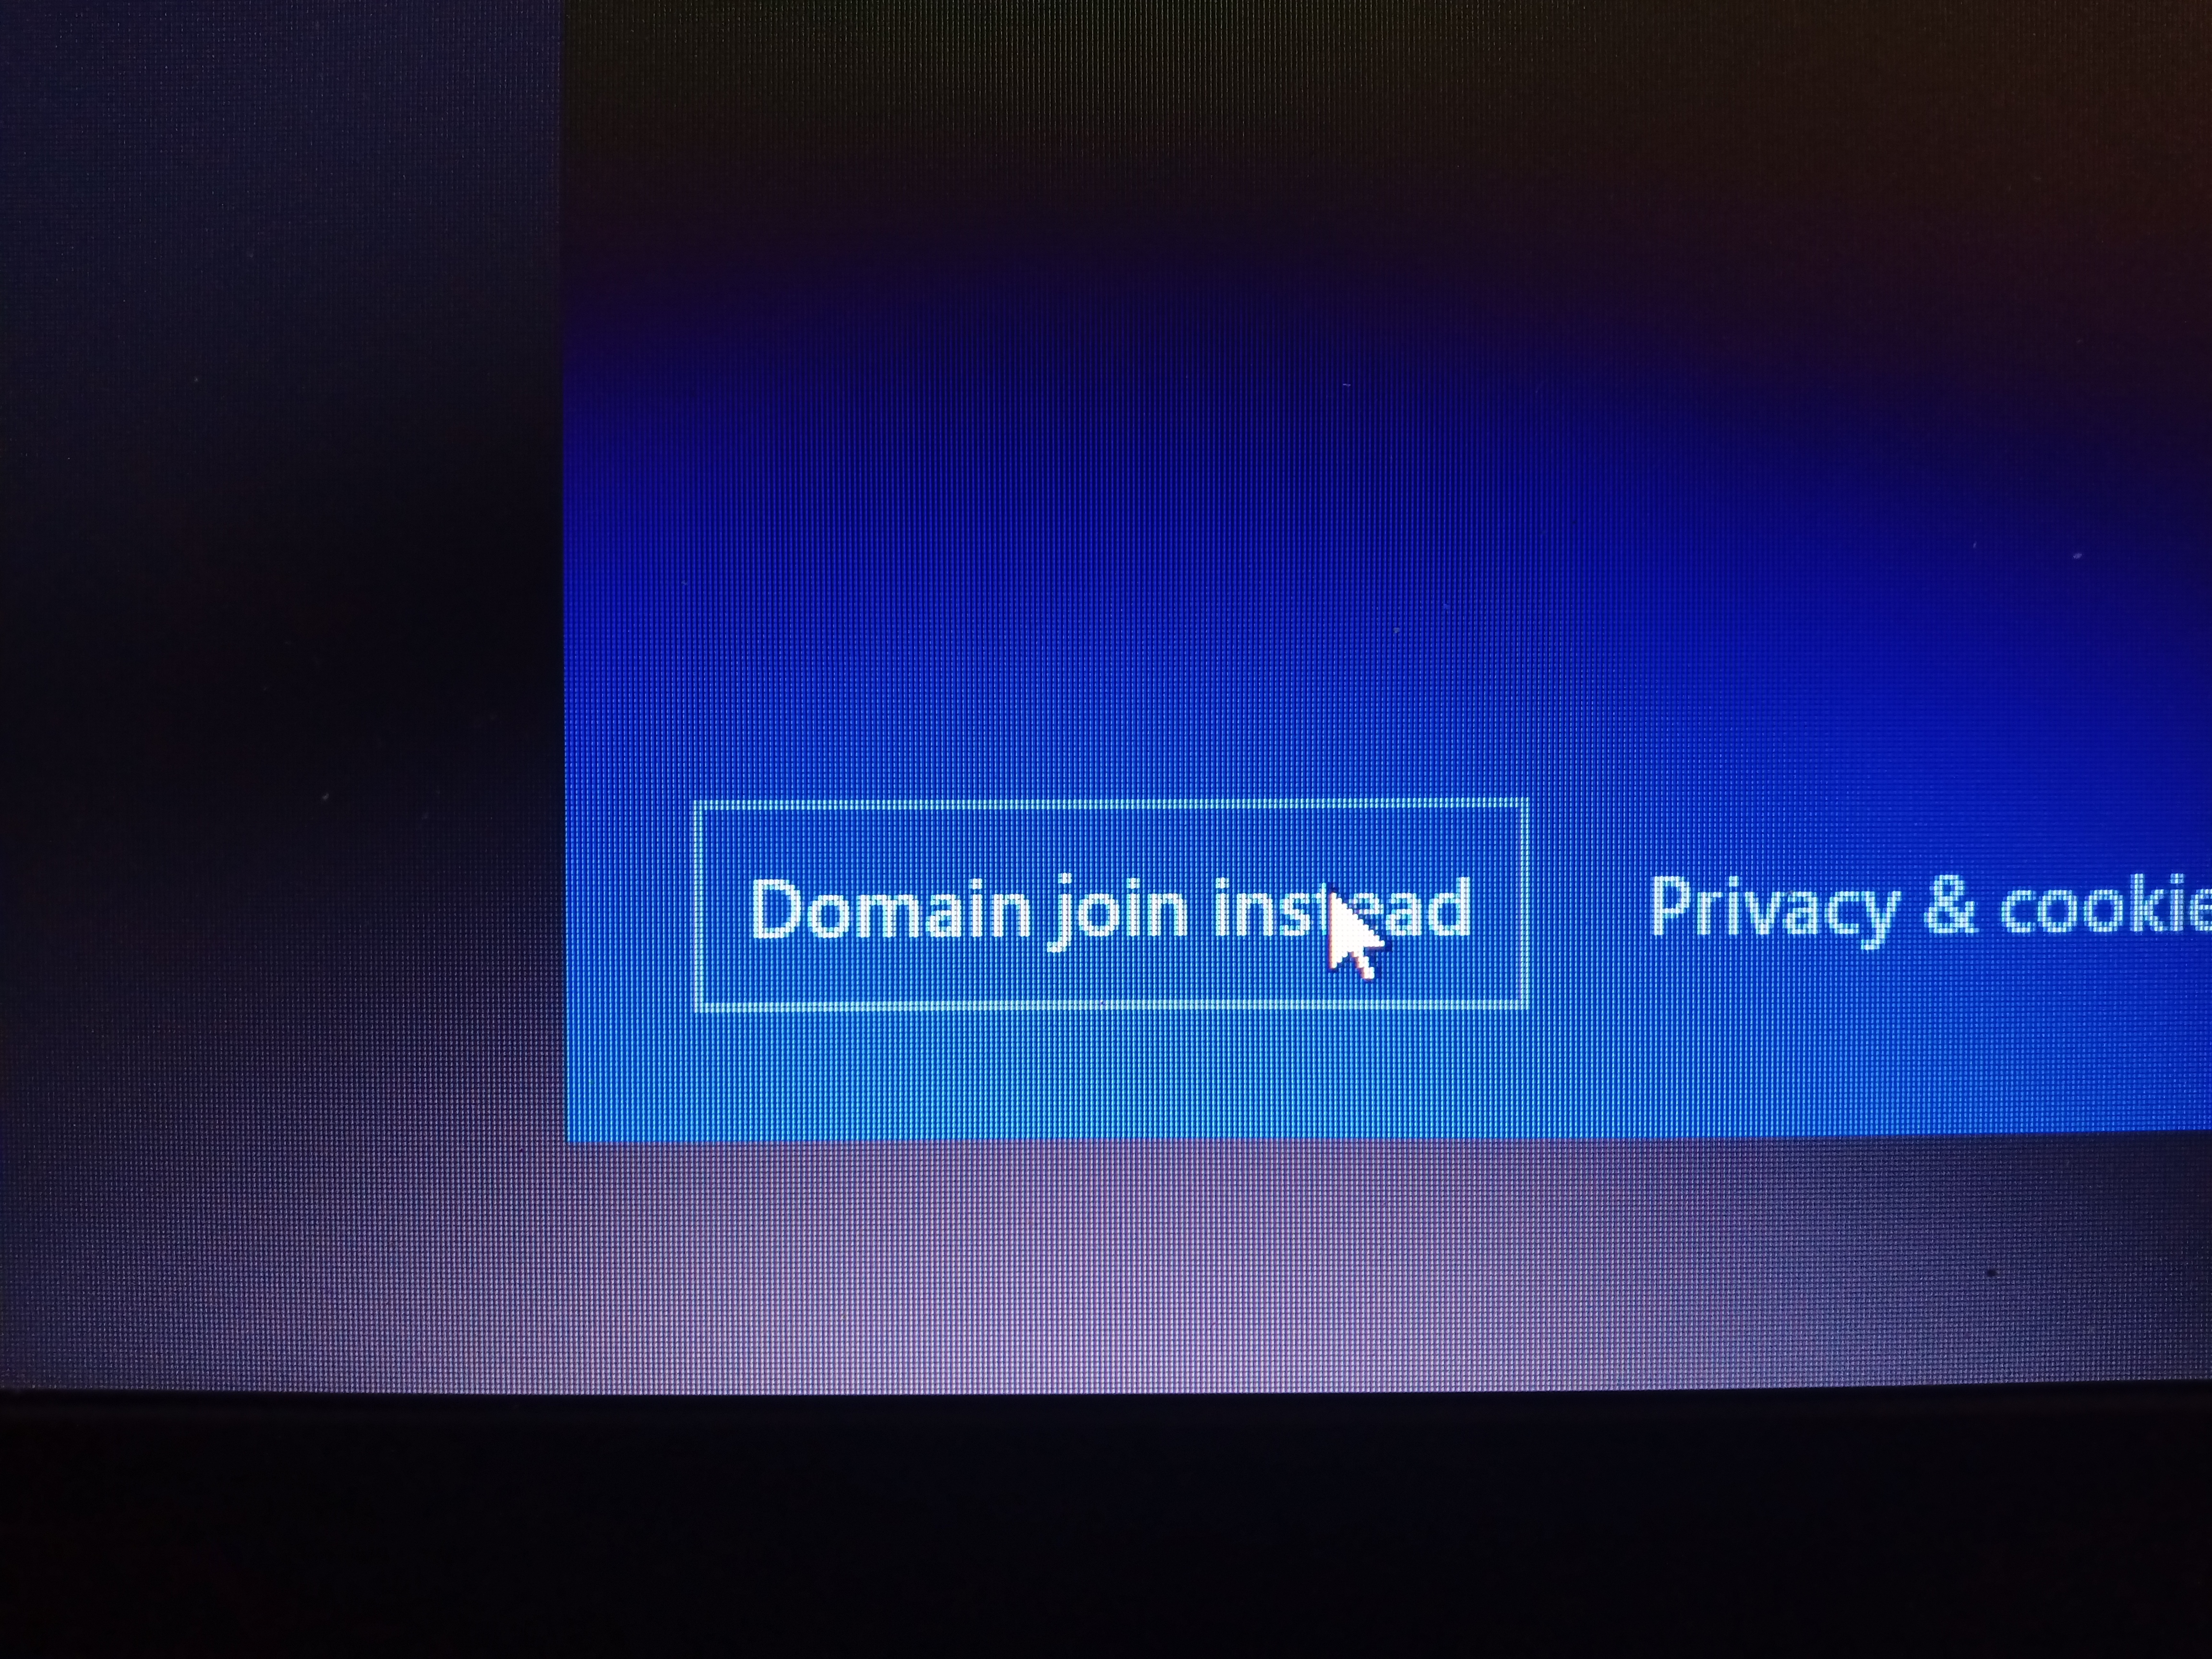
Domain join instead will say “LOCAL ACCOUNT” instead if you have the HOME version. This will let you setup a user name and password right then on the computer just like all previous versions of Windows, and will work like the old Windows 7, which is what we are aiming for. To create a new copy of Windows 10 that works like Windows 7.
Once you click Domain join instead or create local account, it will then ask for the local account ID you want. Notice it will still try and offer that you use a Microsoft Account. Doing do will forever tie that version of windows to a Microsoft account so we don’t want to do that.
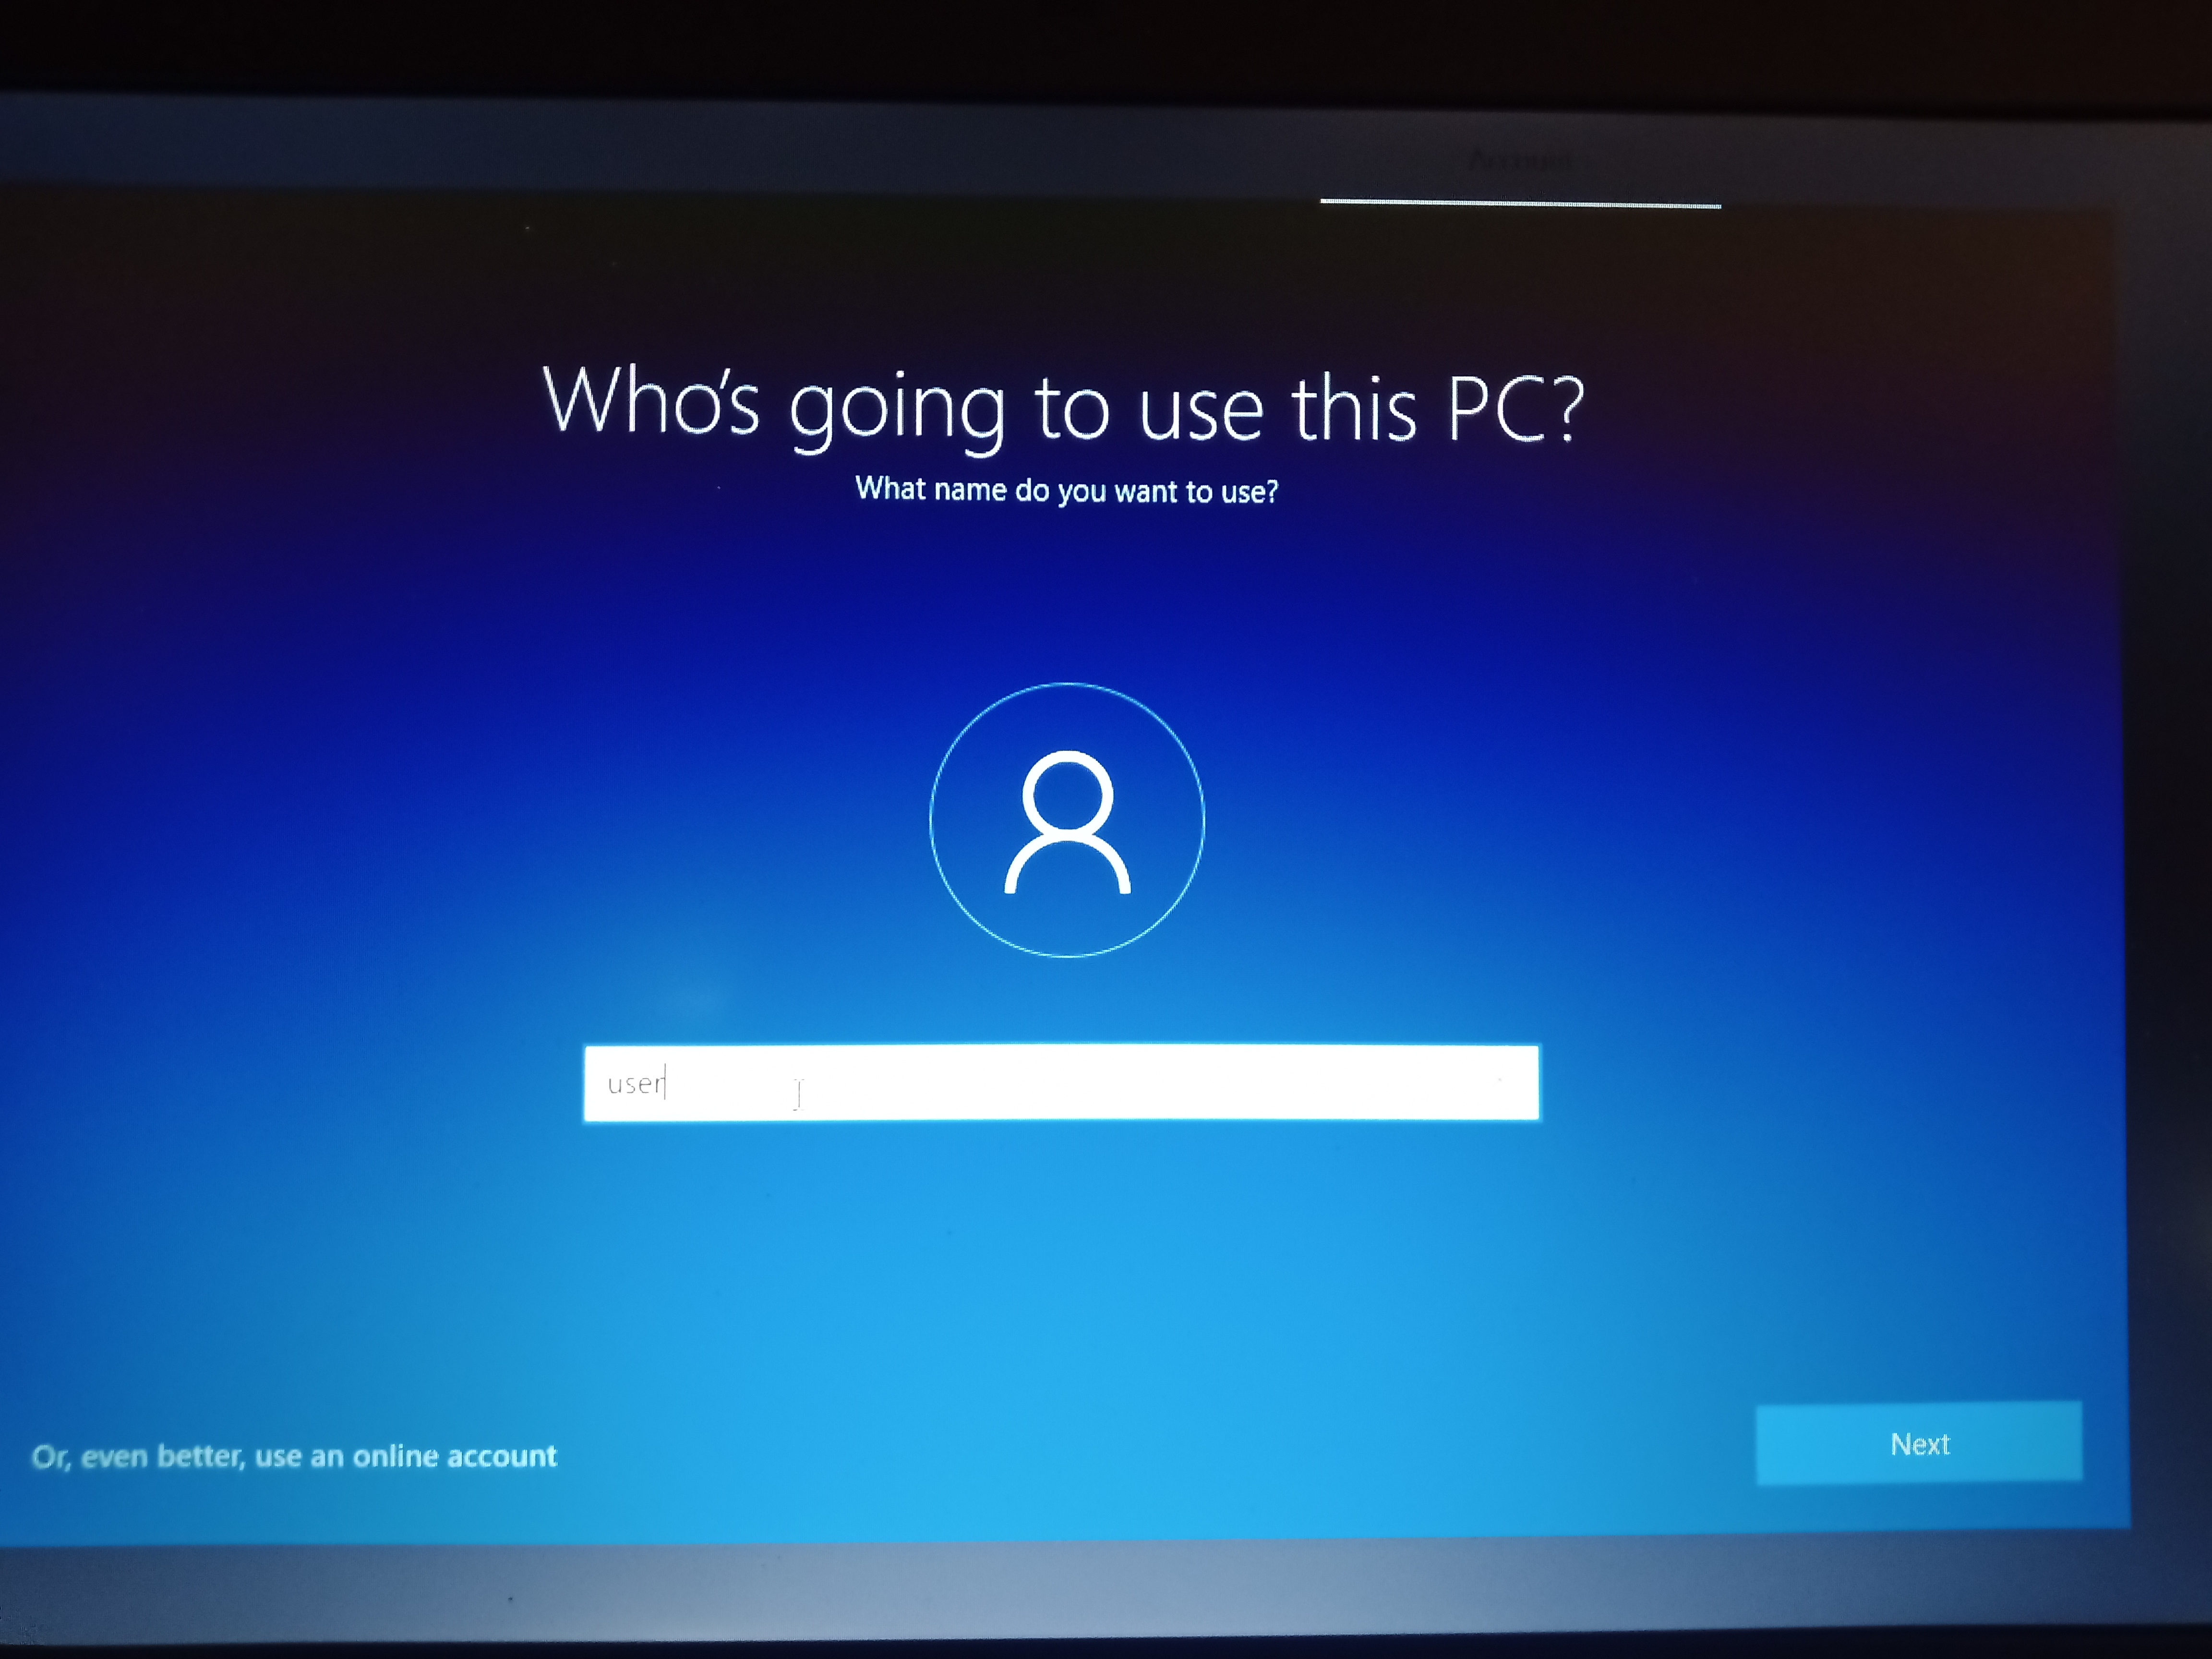
You can use just your first name or “USER” or “ADMIN” , and click NEXT and type in a password and it will ask you to type it in a second time. I usually do not type in a password at this point, because the computer will need multiple reboots for all the updates and software installs, and I set a password only after I have done all of this, just to save the time of having to type in my password over and over as part of the setup.
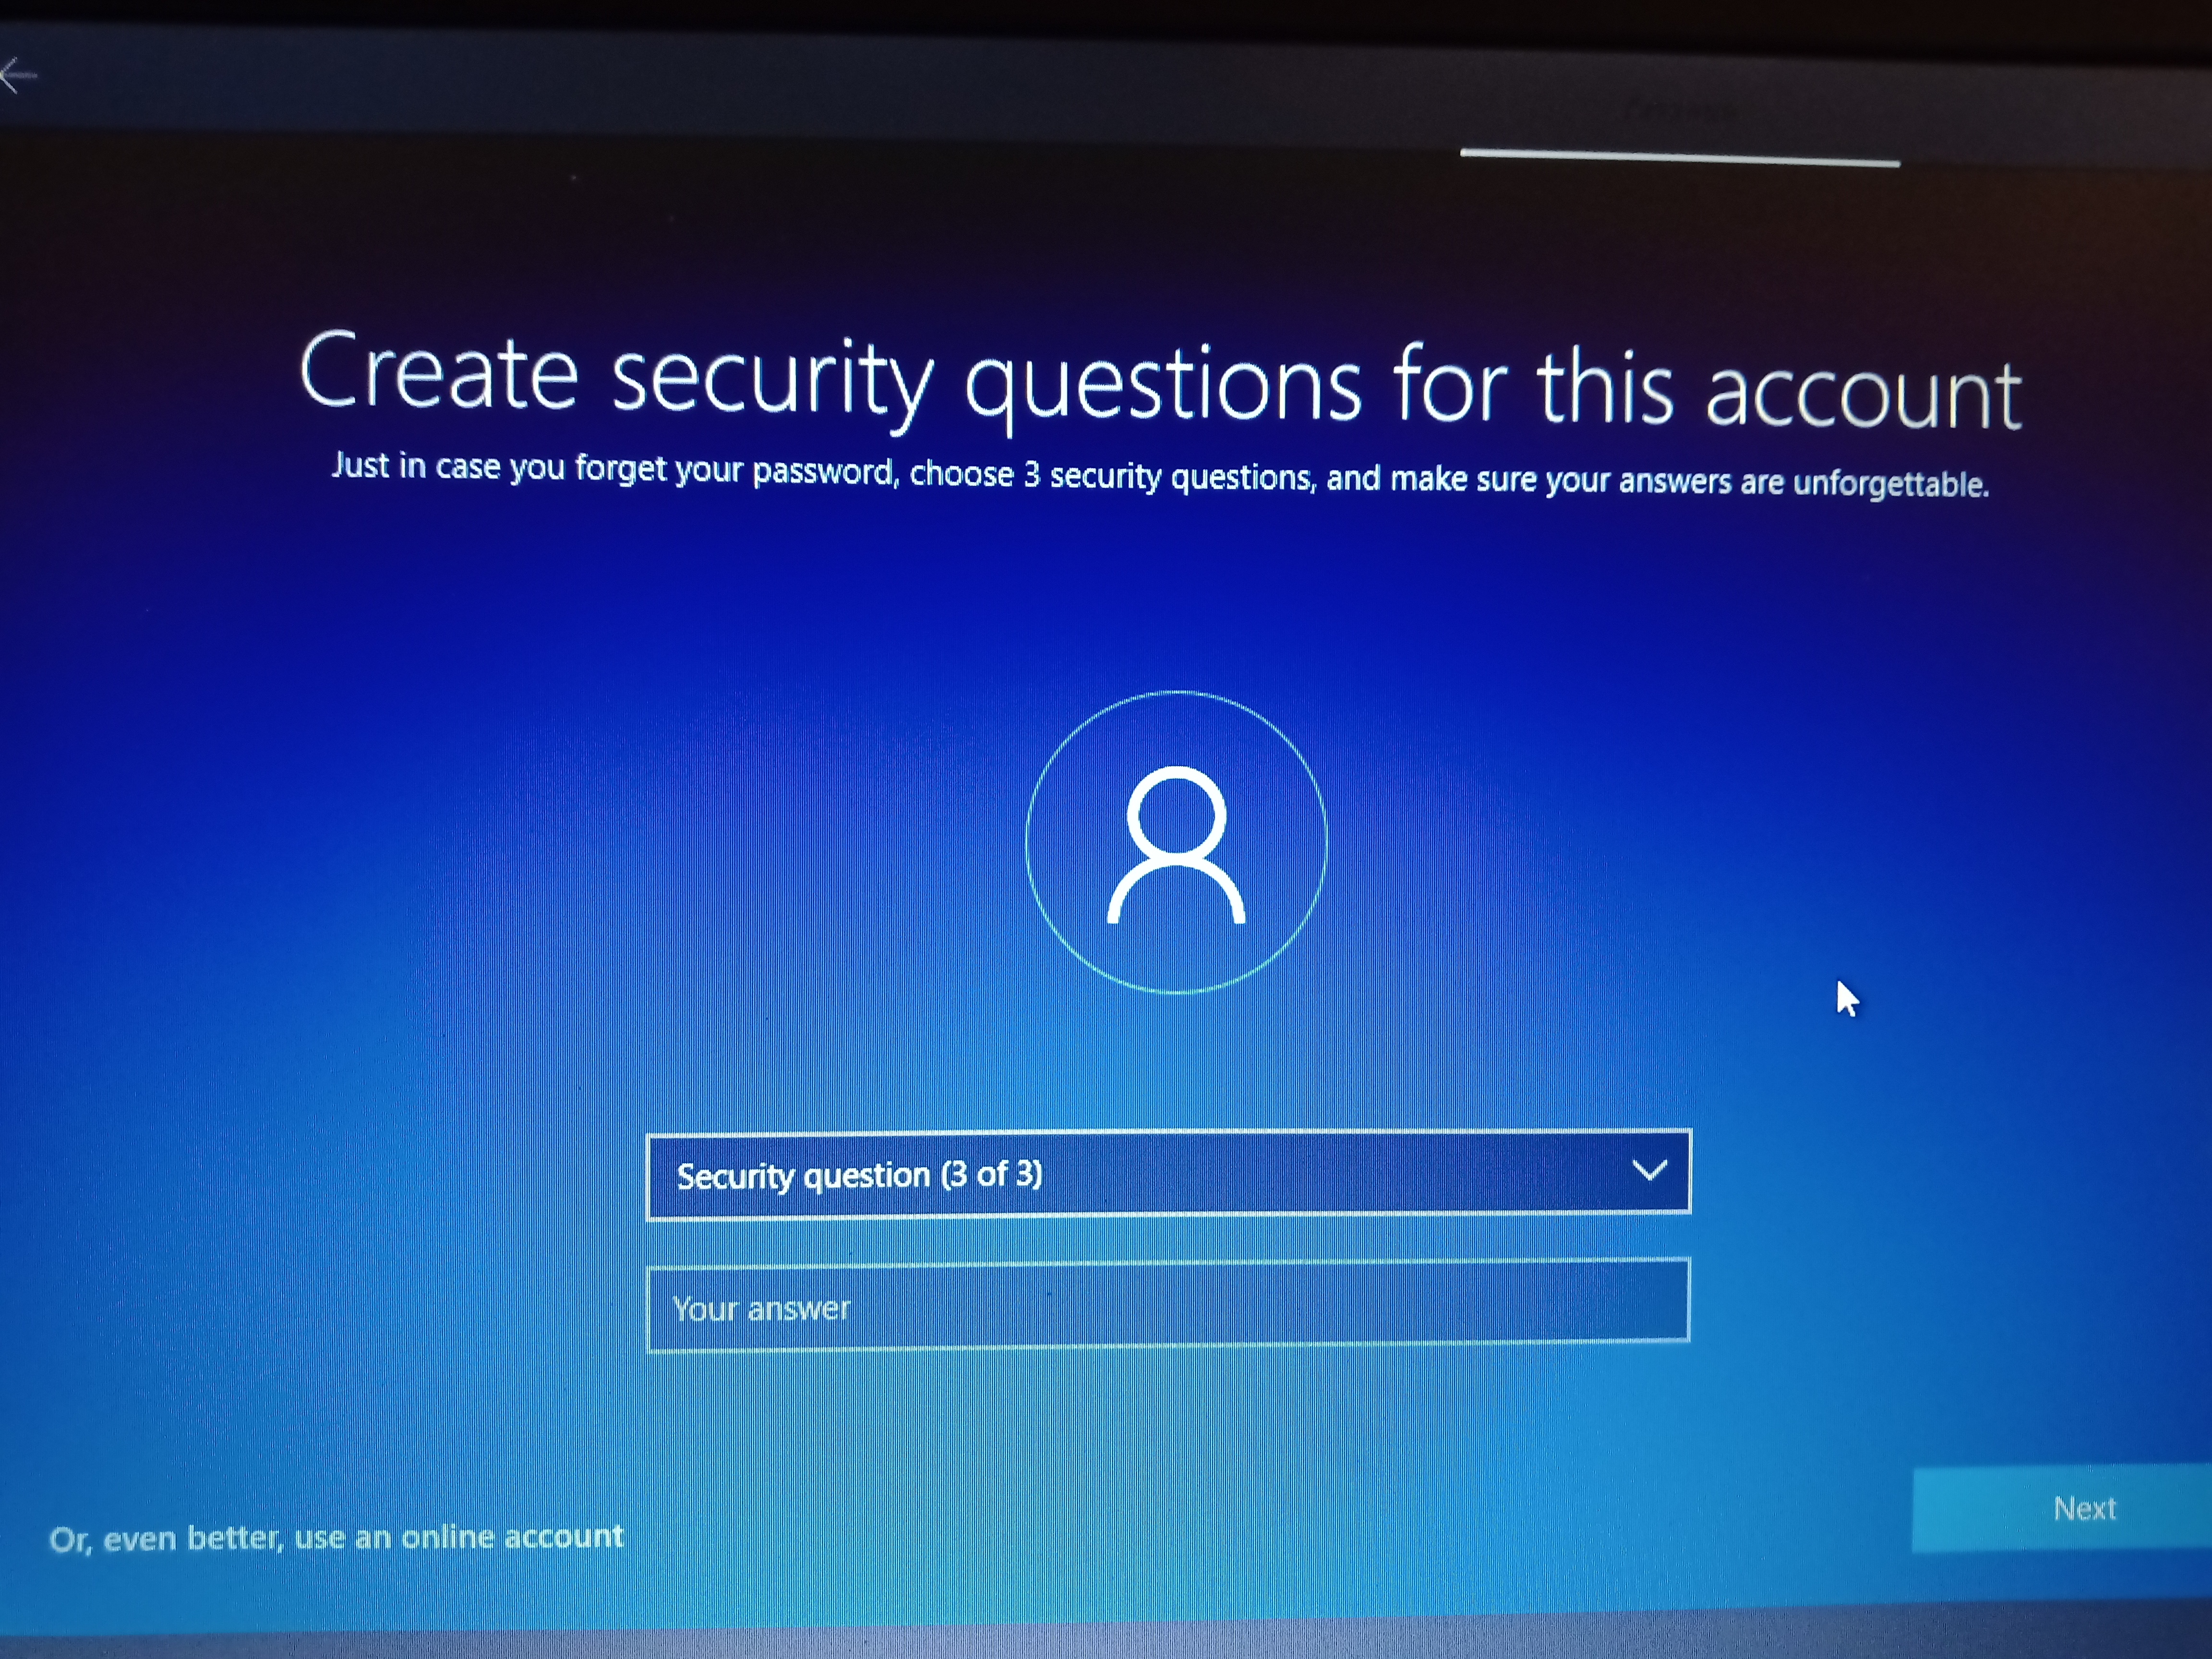
The next step is to answer security questions to create a “back door” in case you lose you password.
Now this is where it gets FUN. Microsoft will “offer” all kinds of tracking and advertising setup IDs. You want to say NO to every one of them.
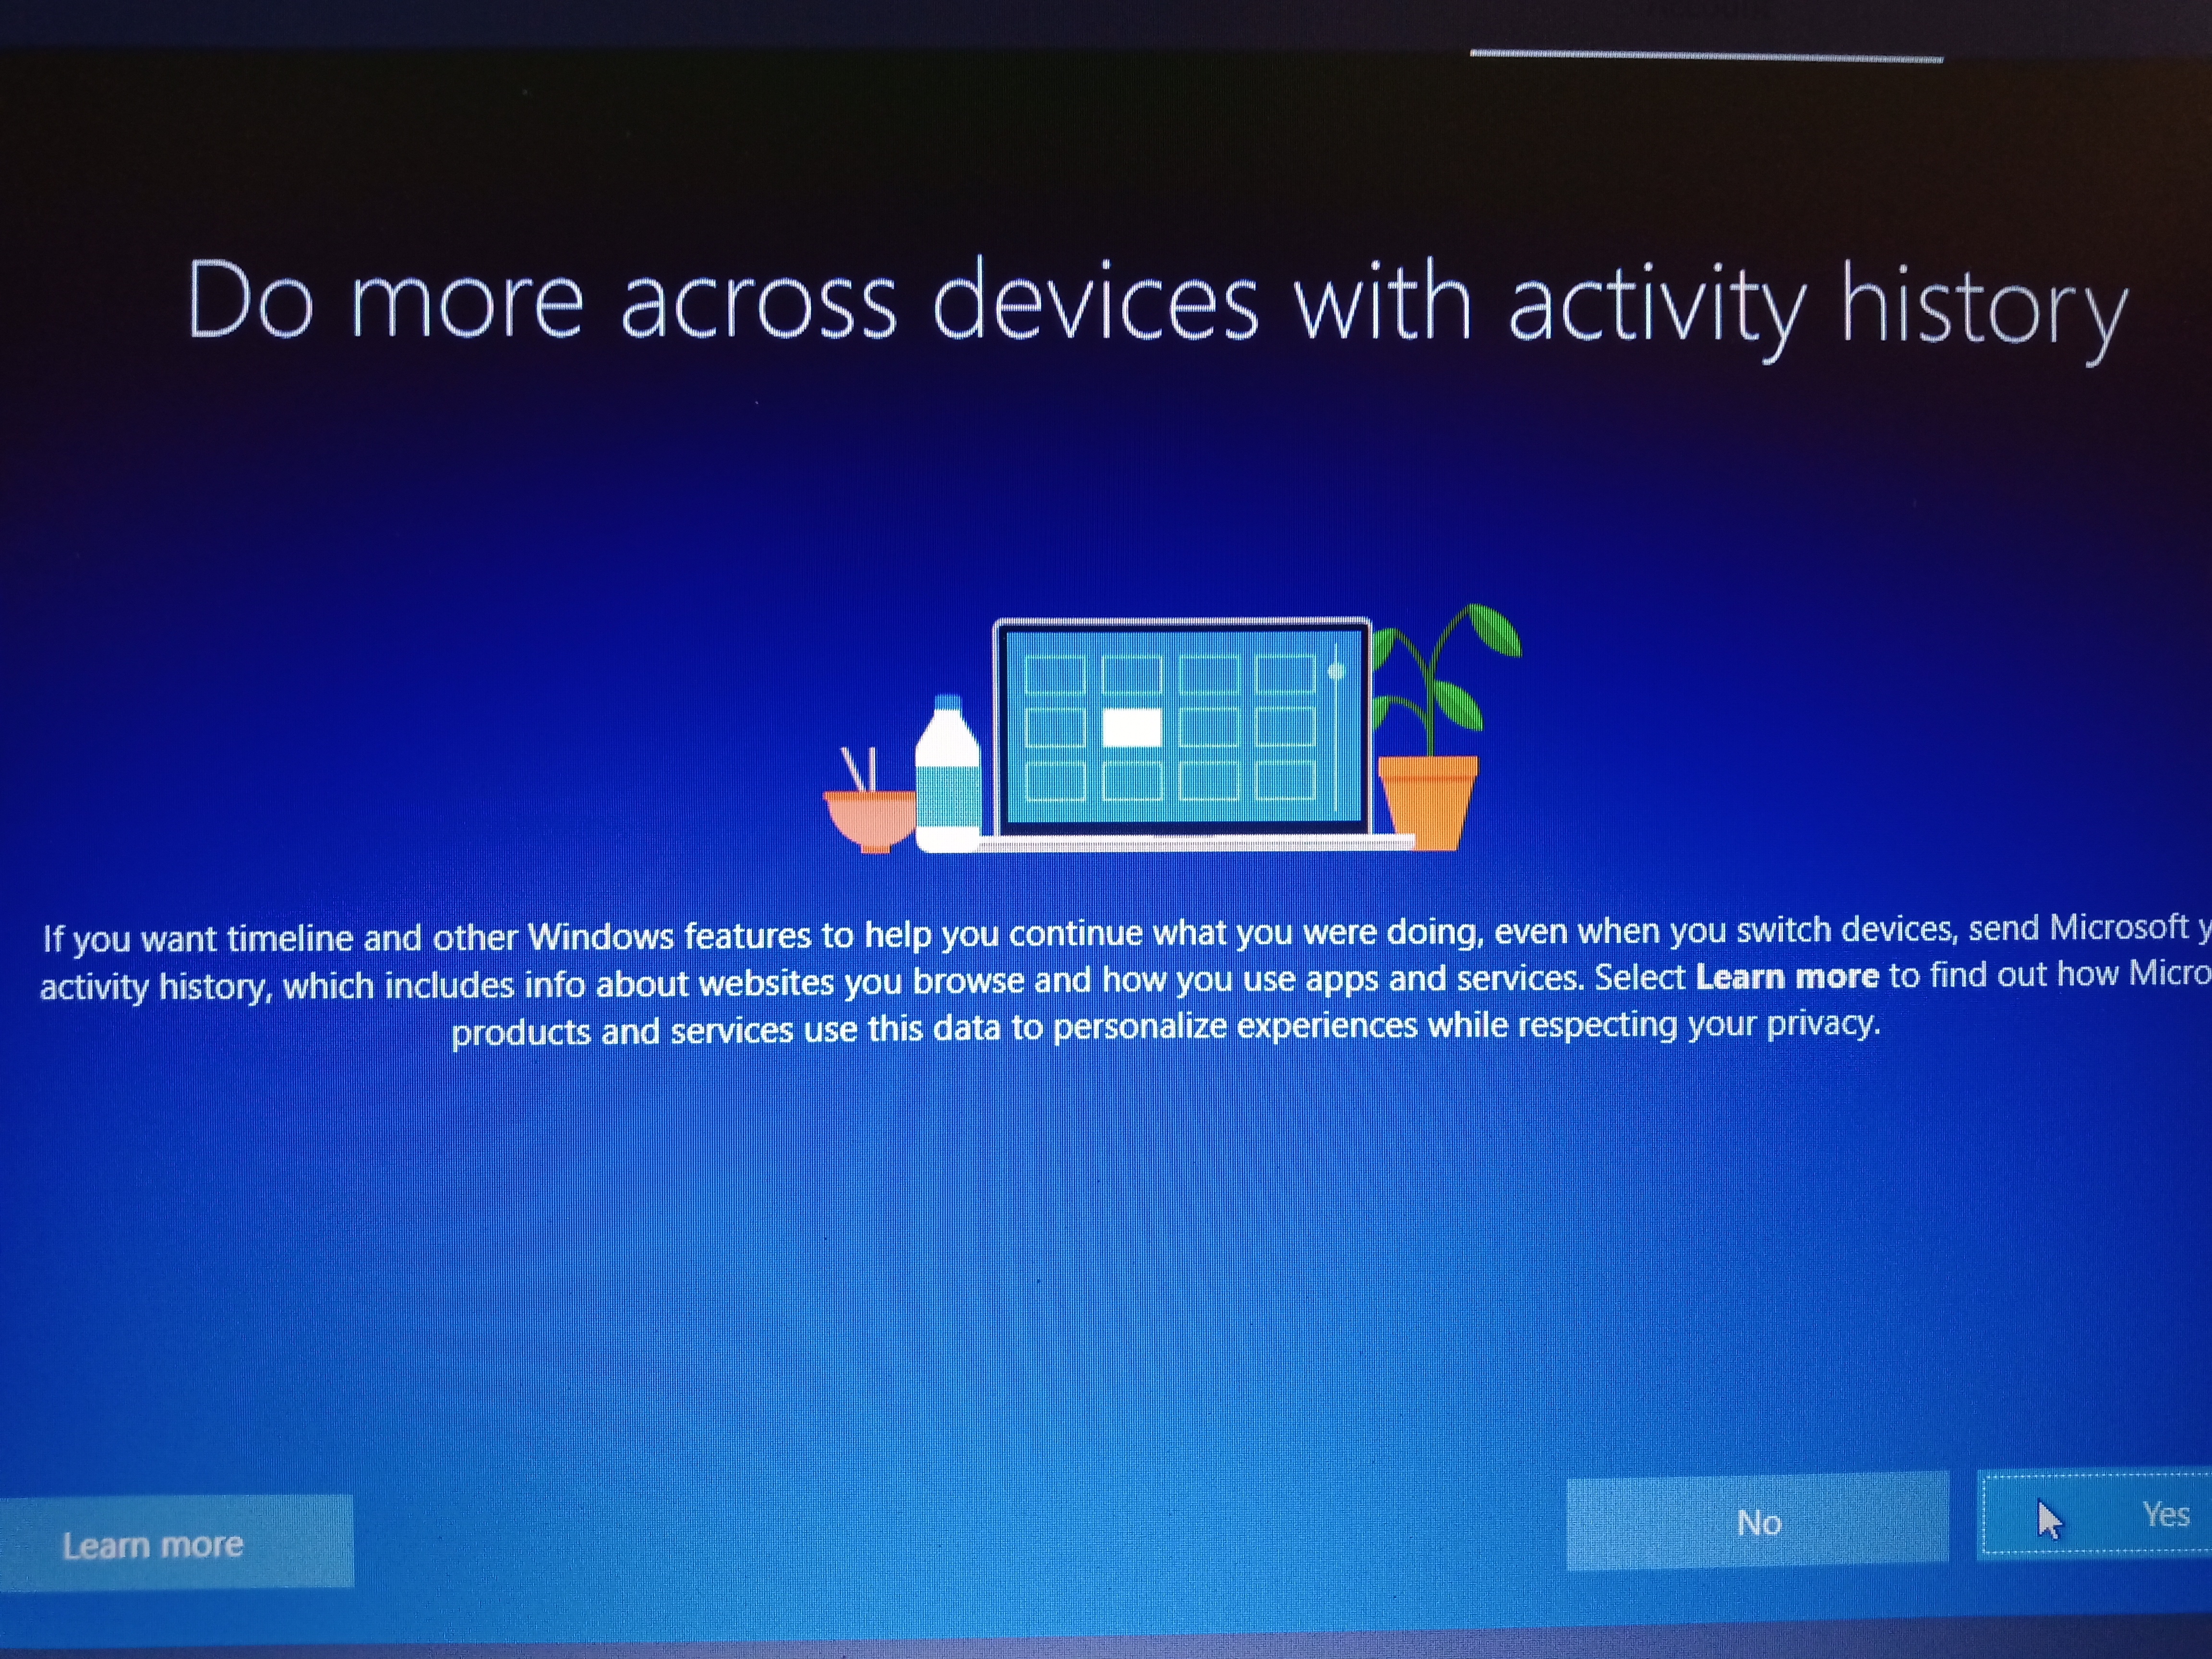
This is a device timelime that ties all your USE to your Microsoft account, since we used a LOCAL account, this isn’t going to work, so skip it. Think of this like GOOGLEMAPS creating daily lists of where you have been. Skip this by answering NO.
Next onto Cortona.
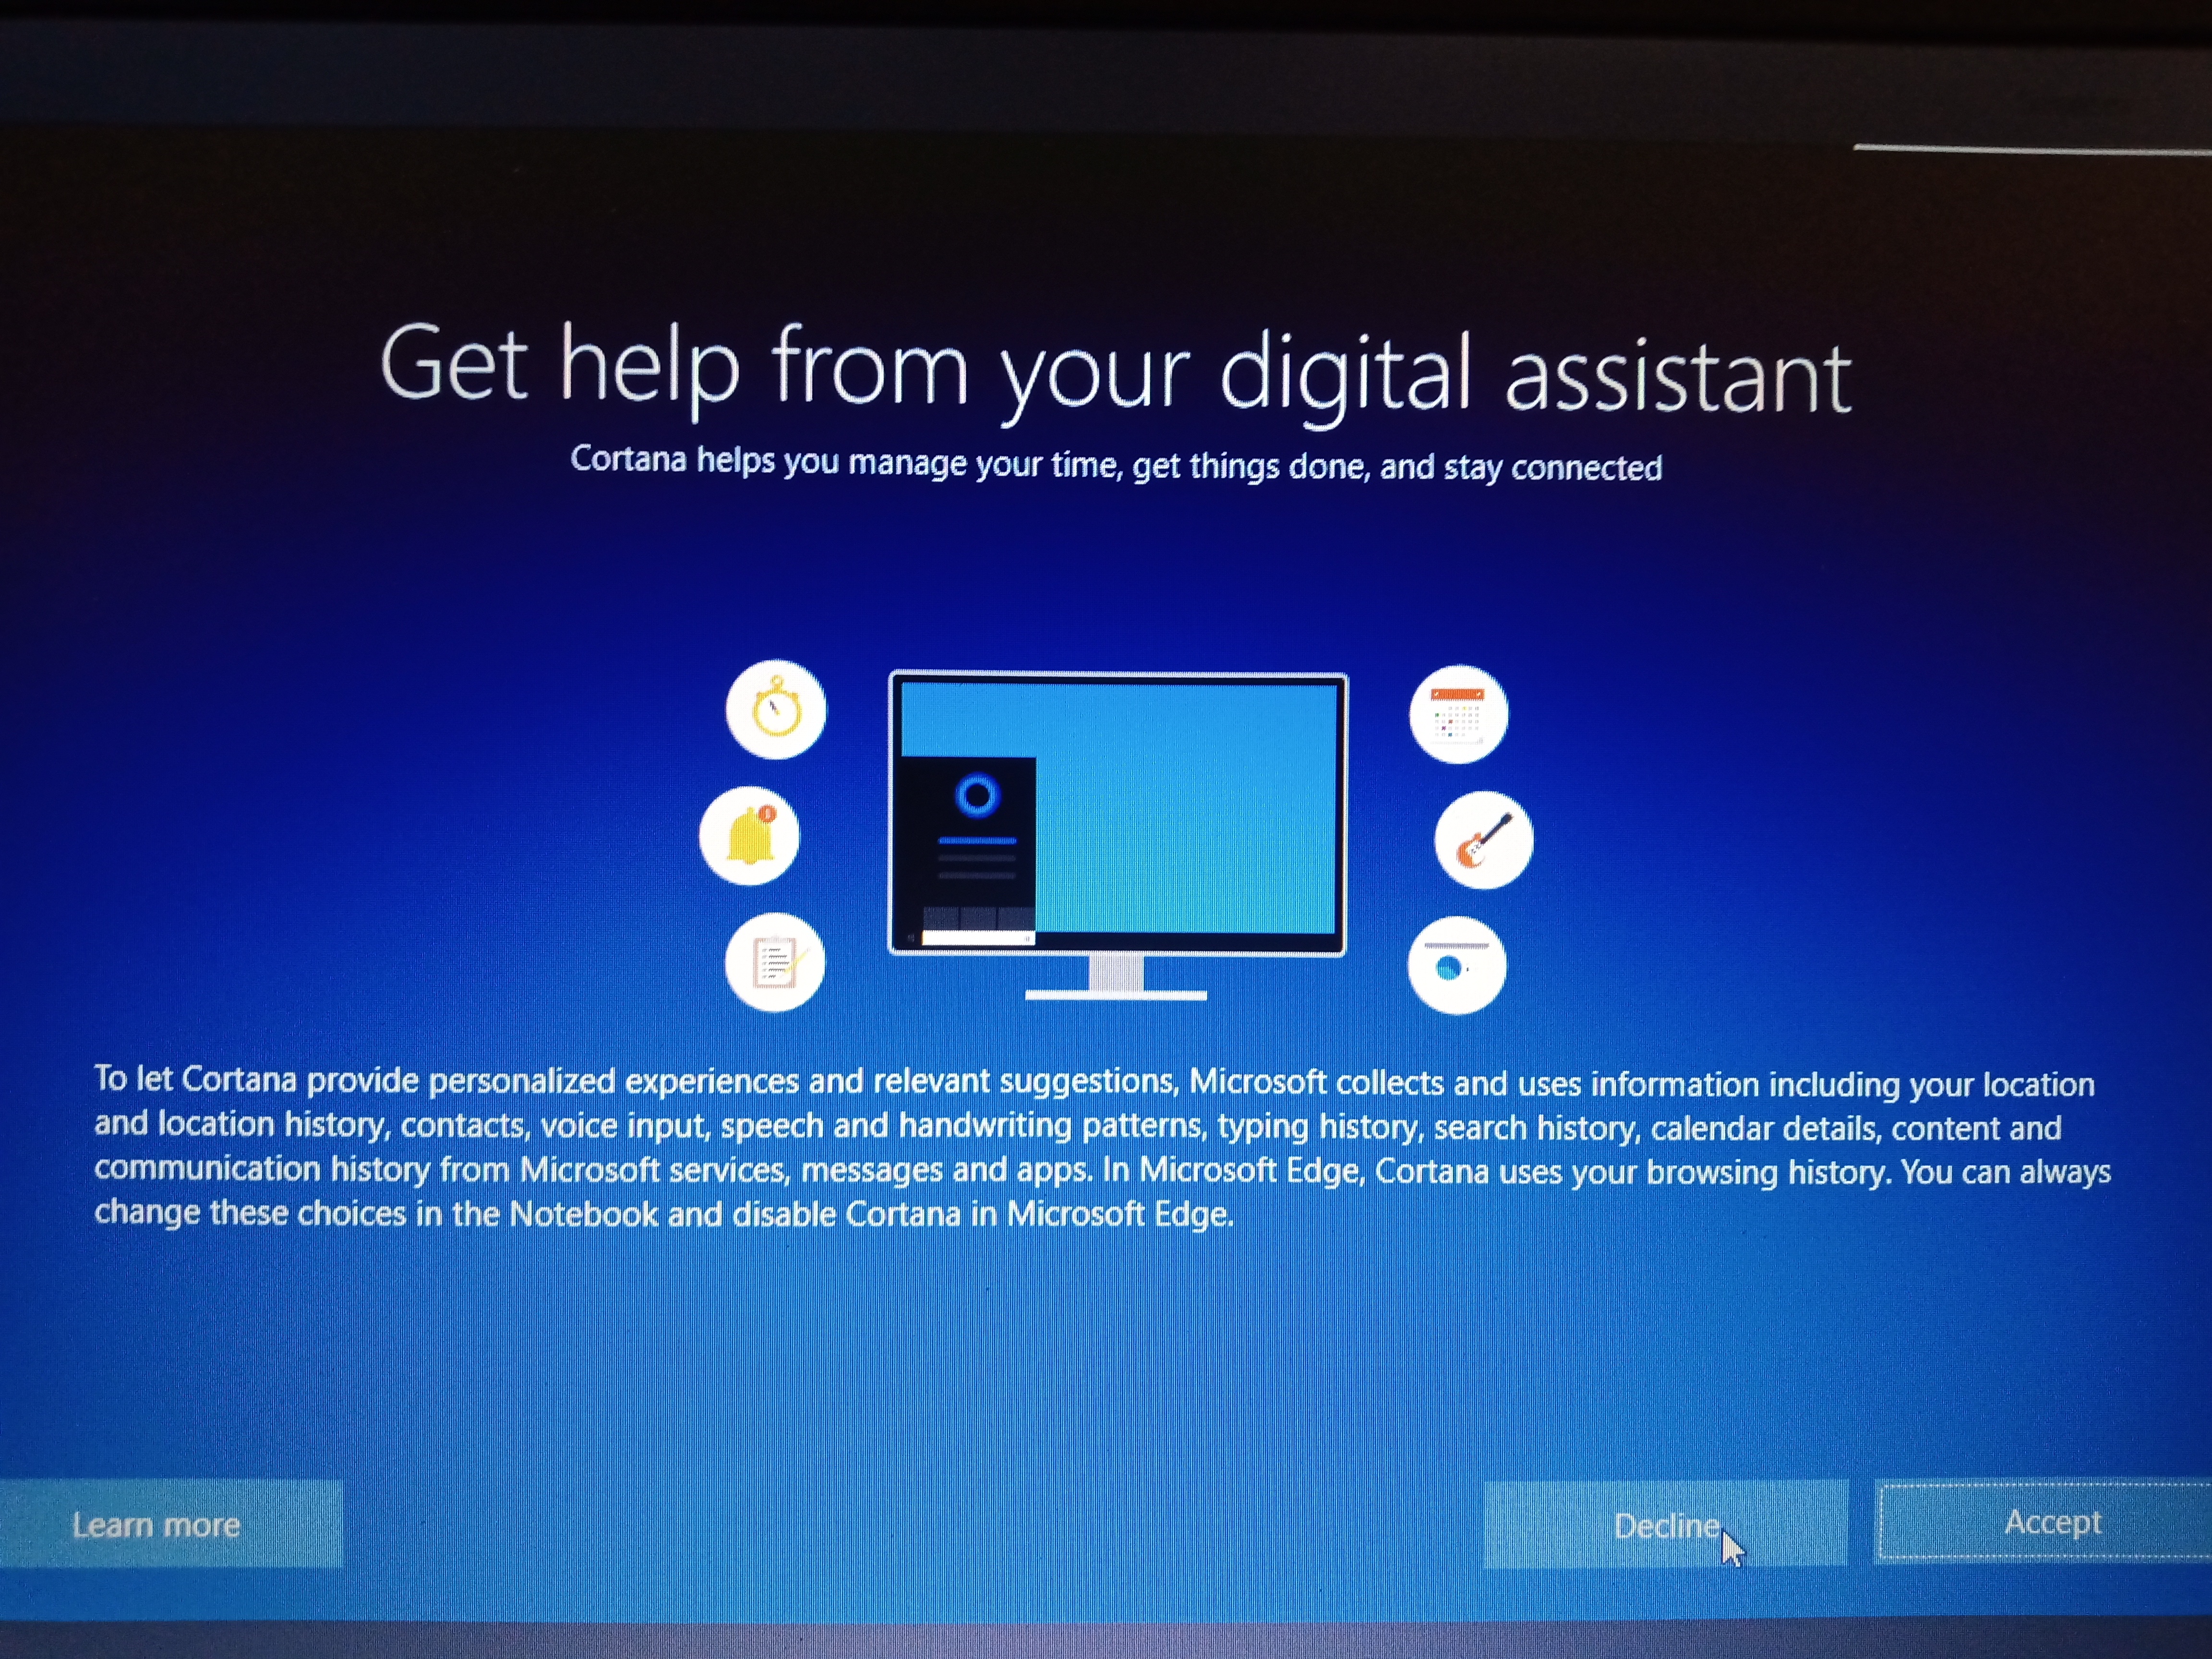
I do not use Cortona, and I find it annoying , constantly popping up and bugging you to try the latest Microsoft “widget”. You can add it later if you like it, or ACEEPT it if you have found Cortona useful. I click DECLINE because I am stripping Windows 10 down to be fast and minimal like Windows 7.
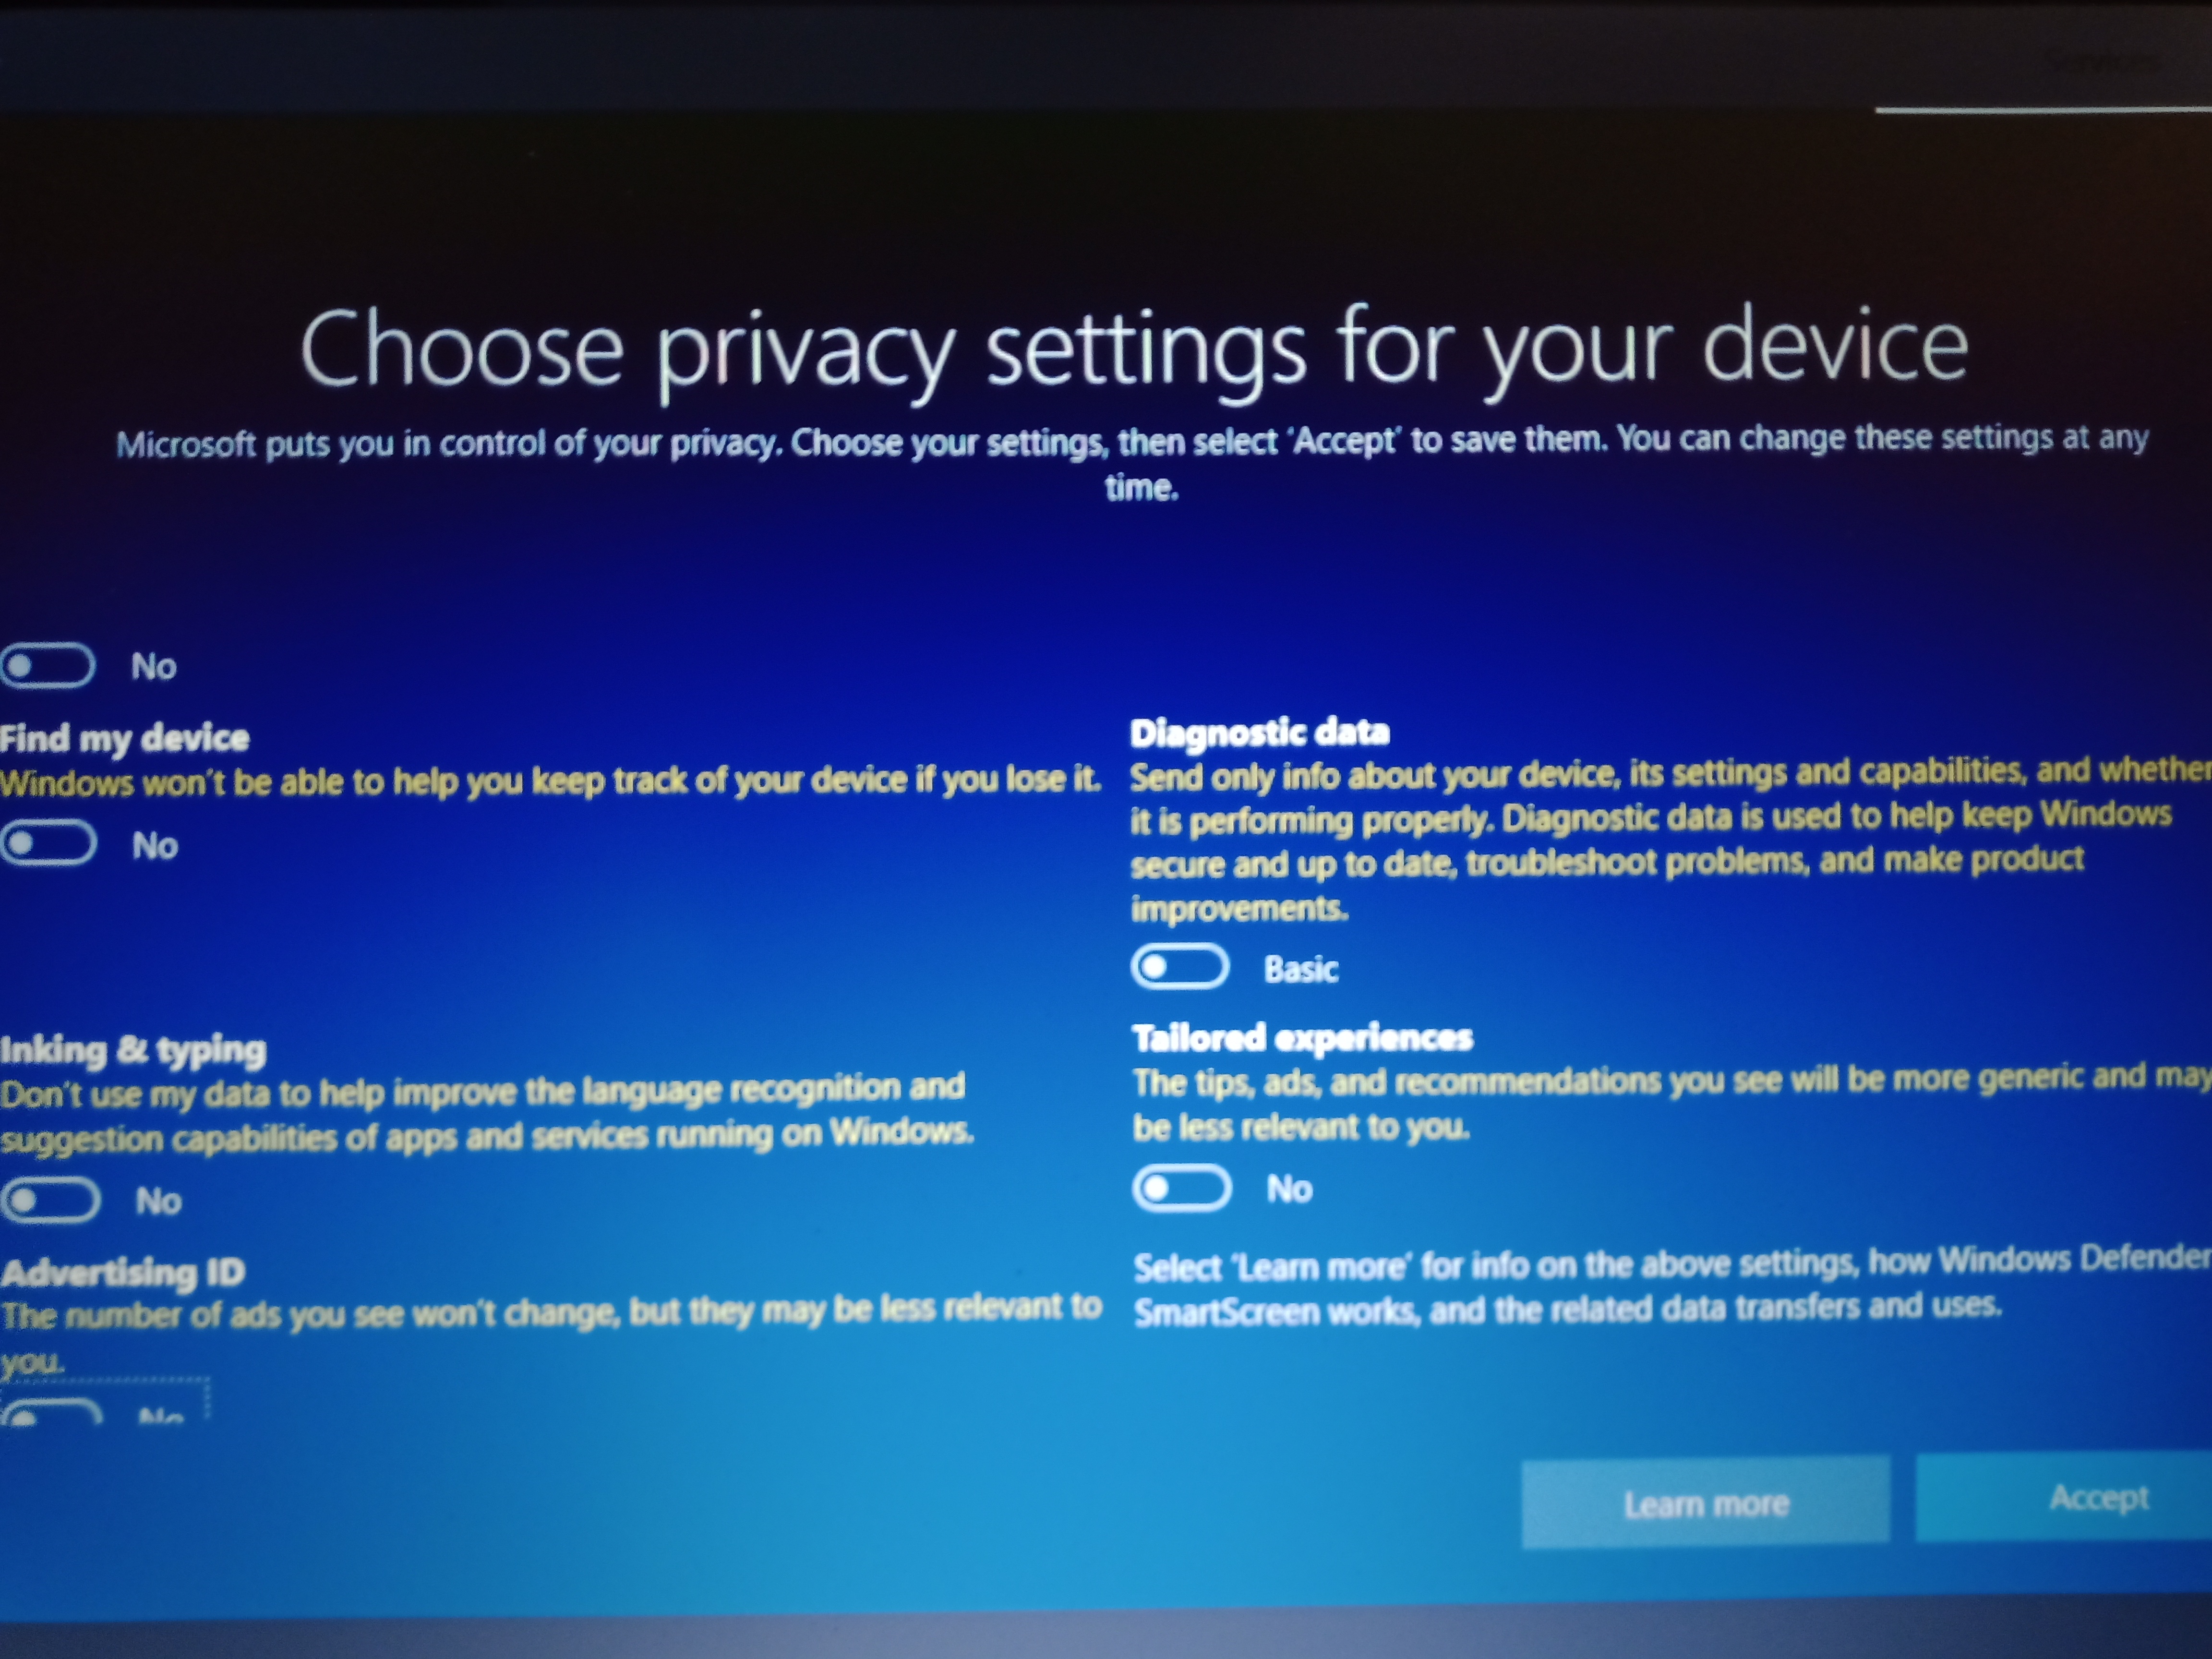
You will want to click NO to every one of these. If you read them, they are ALL some form of tracking so Microsoft can better “serve you” relevant advertisements and so forth. Once again, the point of this installation is to put a stop to all of this, and thats why we are NOT paying for a Windows 10 upgrade to begin with.
YOU ARE DONE. WINDOWS 10 will start to setup your profile and will boot to Windows 10 desktop.
At this point, type at the bottom white toolbar, “UPDATE” and click “Check for updates” which pops up first at the top of the bar, once you click it you will have to click it again on the left and it will start downloading all the updates. Depending on what version of Windows 10 you installed, the update could be pretty quick or take hours. Feature updates take the longest, and those are major releases of new versions of Windows 10.
Go onto my next article. “How to make Windows 10 perform like Windows 7 by removing all the bloatware”.